7 Larry's Castle: Difference between revisions
m (Robot: Changing template: Foreignname) |
(→Trivia: Per discussion in Category talk:Dinosaur Land.) |
||
| (48 intermediate revisions by 25 users not shown) | |||
| Line 1: | Line 1: | ||
{{ | {{title|#7 Larry's Castle}} | ||
{{level | {{level infobox | ||
|title=#7 Larry's Castle | |title=#7 Larry's Castle | ||
|image=[[File:Larry' | |image=[[File:Larry's Castle.png]]<br>Mario on the last block of a snake platform | ||
|code=7-Castle | |code=7-Castle | ||
|world=[[Valley of Bowser]] | |||
|game=''[[Super Mario World]]'' | |game=''[[Super Mario World]]'' | ||
| | |limit=300 seconds | ||
|boss=[[Larry Koopa]] | |boss=[[Larry Koopa]] | ||
| | |before=[[Valley Ghost House|**]] [[Valley of Bowser 4|<<]] | ||
|after=[[Front Door|>>]] | |after=[[Front Door|>>]] | ||
}} | }} | ||
{{quote2|Mario has defeated Larry Koopa in castle #7. All that is left is Bowser's Castle where Princess Toadstool is being held. Can Mario rescue her and restore peace to Dinosaur Land?|In-game text|[[Super Mario World]]}} | |||
'''#7 Larry's Castle''' is a [[level]] in ''[[Super Mario World]]'', as well as the last Koopaling [[castle]] in the game. It can be accessed through either the completion of the level [[Valley of Bowser 4]], or through the secret exit of [[Valley Ghost House]]. It is one of two castle levels in the original game to feature [[Dragon Coin]]s, the other being [[5 Roy's Castle|#5 Roy's Castle]]. | |||
==Level overview== | |||
==Level | |||
[[File:7 Larry's Castle.png|thumb|left|200px|#7 Larry's Castle]] | [[File:7 Larry's Castle.png|thumb|left|200px|#7 Larry's Castle]] | ||
This level starts with a moving [[Snake Block]] (which [[Mario]] must follow) that goes all throughout the first room. In the first room, the player will encounter [[Spinner|Ball ' | This level starts with a moving [[Snake Block|snake platform]] (which [[Mario]] must follow) that goes all throughout the first room. In the first room, the player will encounter [[Spinner|Ball 'N' Chain]]s and spikes. When the raft reaches the top of the level with a door on the right, the player may choose to take the door, or to stay on the raft. If the player stays on the raft, he will see a midpoint section, two [[Dragon Coin]]s and a [[Super Mushroom]]. The door on the right of that section will lead to the same room as the door above. In the second room, the player will see [[Dry Bones]], [[Magikoopa]]s and a few [[Lava Bubble]]s. The yellow blocks are walls, and the player either needs to swing them with a [[Cape Feather]], or allow the Magikoopa to break them. If the Magikoopa breaks a yellow block, it will turn into a Yellow [[Koopa Troopa]], a [[Thwimp]], or a [[1-Up Mushroom]]. Before the final red door, there is a [[Green ! Block]], which gives the player a [[Cape Feather]]. | ||
Notably, the first part of this level can be heavily exploited in order to skip most of the difficult parts of the level. At the beginning of the level, when the | Notably, the first part of this level can be heavily exploited in order to skip most of the difficult parts of the level. At the beginning of the level, when the snake platform moves horizontally after making stairs, if the player goes to the snake's head, runs to the left then jumps when below the above platform, it is possible to land on this solid platform and skip close to half of this part of the level. Furthermore, standing on some of the upper independent Ball 'N' Chains' blocks during the snake platform's first round of the level allows the player to remain on these blocks without taking damage and jump back on board during its second round of the level. | ||
==Enemies== | |||
{|border=1 cellspacing=0 cellpadding=3 style="border-collapse:collapse"style="text-align: center" | |||
!Sprite | |||
!Name | |||
!Count | |||
|- | |||
|[[File:Ball N Chain.png]] | |||
|[[Spinner|Ball 'N' Chain]] | |||
|12 | |||
|- | |||
|[[File:Pointy Pillars.png]] | |||
|[[Spike (Super Mario World)|Spike]] | |||
|11 | |||
|- | |||
|[[File:SMWDB.png]] | |||
|[[Dry Bones]] | |||
|6 | |||
|- | |||
|[[File:SMW Magikoopa.png]] | |||
|[[Magikoopa]] | |||
|1 | |||
|- | |||
|[[File:SMW KoopaTroopa Yellow.png]] | |||
|[[Koopa Troopa]] (yellow) | |||
|(from [[Rotating Block]]s) | |||
|- | |||
|[[File:Thwimp.png]] | |||
|[[Thwimp]] | |||
|(from Rotating Blocks) | |||
|- | |||
|[[File:Rainbowshell.gif]] | |||
|[[Shell (flashing)|Flashing shell]] | |||
|(nearby shell) | |||
|- | |||
|[[File:SMW Lava Blubbe.png]] | |||
|[[Lava Bubble]] | |||
|7 | |||
|- | |||
|[[File:SMWLarryKoopaSprite.png]] | |||
|[[Larry Koopa]] | |||
|1 (boss) | |||
|} | |||
==Boss battle== | |||
[[File:Larry'sCastle.png|thumb|left|200px|Mario fighting [[Larry Koopa]] at the end.]] | |||
The player fights [[Larry Koopa]] at the end; his fighting method is similar to that of [[Iggy Koopa]] in [[1 Iggy's Castle|#1 Iggy's Castle]], except there are also three Lava Bubbles present as well (one at each side, and one in the center). When this level is cleared, the player will gain access to Bowser's [[Front Door]]. In the cutscene depicting the castle's destruction, Mario lifts the castle up and kicks it away before it breaks apart offscreen, with Mario then posing. | |||
{{br}} | {{br}} | ||
==Names in other languages== | ==Names in other languages== | ||
{{foreign names | {{foreign names | ||
|Jap=まおうクッパのたにのしろ | |Jap=まおうクッパのたにのしろ | ||
|JapR=Maō Kuppa no Tani no Shiro | |JapR=Maō Kuppa no Tani no Shiro | ||
|JapM= | |JapM=King Koopa's Valley's Castle | ||
|Fre=#7 Chateau de Larry | |||
|FreM=#7 Larry's Castle | |||
|Ger=7. Larrys Festung | |||
|GerM=7. Larry's Fortress | |||
|Ita=Castello della Valle di Bowser | |||
|ItaM=Valley of Bowser Castle | |||
|Spa=Castillo 7º. Larry | |Spa=Castillo 7º. Larry | ||
|SpaM=7th Castle. Larry | |SpaM=7th Castle. Larry | ||
}} | }} | ||
{{SMW | ==Trivia== | ||
[[Category: | [[File:SMW beta Larry boss fight.jpg|thumb|A 1989 build of the fight. Larry's hairstyle is also slightly different.]] | ||
*[[List of Super Mario World pre-release and unused content|Originally]], Larry's boss fight was different: He had the ability to jump and the platform on which he is fought was closer to the lava. | |||
{{SMW levels}} | |||
[[Category:Underground areas]] | |||
[[Category:Castles]] | [[Category:Castles]] | ||
[[Category: | [[Category:Volcanic areas]] | ||
[[Category: | [[Category:Super Mario World levels]] | ||
Revision as of 13:58, January 26, 2024
| Level | |
|---|---|
| #7 Larry's Castle | |
 Mario on the last block of a snake platform | |
| Level code | 7-Castle |
| World | Valley of Bowser |
| Game | Super Mario World |
| Time limit | 300 seconds |
| Boss | Larry Koopa |
| ** << Directory of levels >> | |
Template:Quote2 #7 Larry's Castle is a level in Super Mario World, as well as the last Koopaling castle in the game. It can be accessed through either the completion of the level Valley of Bowser 4, or through the secret exit of Valley Ghost House. It is one of two castle levels in the original game to feature Dragon Coins, the other being #5 Roy's Castle.
Level overview
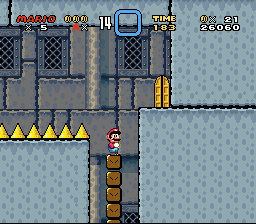
This level starts with a moving snake platform (which Mario must follow) that goes all throughout the first room. In the first room, the player will encounter Ball 'N' Chains and spikes. When the raft reaches the top of the level with a door on the right, the player may choose to take the door, or to stay on the raft. If the player stays on the raft, he will see a midpoint section, two Dragon Coins and a Super Mushroom. The door on the right of that section will lead to the same room as the door above. In the second room, the player will see Dry Bones, Magikoopas and a few Lava Bubbles. The yellow blocks are walls, and the player either needs to swing them with a Cape Feather, or allow the Magikoopa to break them. If the Magikoopa breaks a yellow block, it will turn into a Yellow Koopa Troopa, a Thwimp, or a 1-Up Mushroom. Before the final red door, there is a Green ! Block, which gives the player a Cape Feather.
Notably, the first part of this level can be heavily exploited in order to skip most of the difficult parts of the level. At the beginning of the level, when the snake platform moves horizontally after making stairs, if the player goes to the snake's head, runs to the left then jumps when below the above platform, it is possible to land on this solid platform and skip close to half of this part of the level. Furthermore, standing on some of the upper independent Ball 'N' Chains' blocks during the snake platform's first round of the level allows the player to remain on these blocks without taking damage and jump back on board during its second round of the level.
Enemies
| Sprite | Name | Count |
|---|---|---|

|
Ball 'N' Chain | 12 |
| Spike | 11 | |
| Dry Bones | 6 | |
| Magikoopa | 1 | |
| Koopa Troopa (yellow) | (from Rotating Blocks) | |
| Thwimp | (from Rotating Blocks) | |
| Flashing shell | (nearby shell) | |
| Lava Bubble | 7 | |
| Larry Koopa | 1 (boss) |
Boss battle

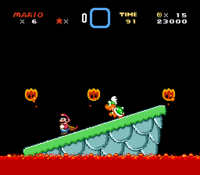
The player fights Larry Koopa at the end; his fighting method is similar to that of Iggy Koopa in #1 Iggy's Castle, except there are also three Lava Bubbles present as well (one at each side, and one in the center). When this level is cleared, the player will gain access to Bowser's Front Door. In the cutscene depicting the castle's destruction, Mario lifts the castle up and kicks it away before it breaks apart offscreen, with Mario then posing.
Names in other languages
| Language | Name | Meaning |
|---|---|---|
| Japanese | まおうクッパのたにのしろ Maō Kuppa no Tani no Shiro |
King Koopa's Valley's Castle |
| French |
| |
| German | 7. Larrys Festung |
7. Larry's Fortress |
| Italian | Castello della Valle di Bowser |
Valley of Bowser Castle |
| Spanish | Castillo 7º. Larry |
7th Castle. Larry |
Trivia
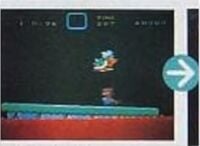
- Originally, Larry's boss fight was different: He had the ability to jump and the platform on which he is fought was closer to the lava.

