Flip-Swap Galaxy: Difference between revisions
Trig Jegman (talk | contribs) m (→Missions) |
Nintendo101 (talk | contribs) mNo edit summary |
||
| (24 intermediate revisions by 11 users not shown) | |||
| Line 1: | Line 1: | ||
{{ | {{course infobox | ||
|image=[[File:FlipSwapGalaxy.png|250px]] | |image=[[File:FlipSwapGalaxy.png|250px]] | ||
|area=[[World 1 (Super Mario Galaxy 2)|World 1]] | |area=[[World 1 (Super Mario Galaxy 2)|World 1]] | ||
| | |comets=[[Purple Comet]]<br>[[Green Comet]] | ||
| | |missions=[[Think Before You Shake]]<br>[[Purple Coin Flip 'n' Sprint]]<br>[[#Green Star 1|Green Star 1]]<br>[[#Green Star 2|Green Star 2]] | ||
|stars=[[File:Smg2 icon powerstar.png|20px]][[File:Smg2 icon prankstercomet.png|20px]][[File:Smg2 icon greencomet.png|Green Star 1|20px]][[File:Smg2 icon greencomet.png|Green Star 2|20px]] | |stars=[[File:Smg2 icon powerstar.png|20px]][[File:Smg2 icon prankstercomet.png|20px]][[File:Smg2 icon greencomet.png|Green Star 1|20px]][[File:Smg2 icon greencomet.png|Green Star 2|20px]] | ||
|unlock=Get 3 [[Power Star]]s, including the first one from [[Yoshi Star Galaxy]], then feed the [[Hungry Luma]] on the World 1 map 300 [[Star Bit]]s | |unlock=Get 3 [[Power Star]]s, including the first one from [[Yoshi Star Galaxy]], then feed the [[Hungry Luma]] on the World 1 map 300 [[Star Bit]]s | ||
|icon=A 2x2 square section of [[Flip-Swap Platform|flipping red and blue platforms]] | |icon=A 2x2 square section of [[Flip-Swap Platform|flipping red and blue platforms]] | ||
| | |more=[[Fluffy Bluff Galaxy|<<]] [[Rightside Down Galaxy|>>]] | ||
}} | }} | ||
{{quote|Jump! Spin! Make 'em flip!|Star Bunny|Super Mario Galaxy 2}} | {{quote|Jump! Spin! Make 'em flip!|Star Bunny|Super Mario Galaxy 2}} | ||
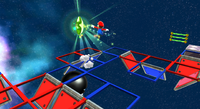
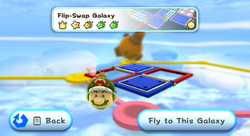
'''Flip-Swap Galaxy''' is a galaxy that appears in ''[[Super Mario Galaxy 2]]''. It is located in [[World 1 (Super Mario Galaxy 2)|World 1]] and is based on levels from ''[[Super Mario Galaxy]]'' and ''[[Super Mario Sunshine]]''. Performing a [[Spin Jump]] will make the red and blue [[Red-Blue Panel]]s flip over and swap places. [[Chomp]]s also appear on the red and blue platforms, along with other enemies, like [[Goomba]]s. A [[Star Bunny]] also makes an appearance here and gives out a hint. | '''Flip-Swap Galaxy''' is a galaxy that appears in ''[[Super Mario Galaxy 2]]''. It is located in [[World 1 (Super Mario Galaxy 2)|World 1]] and is based on levels from ''[[Super Mario Galaxy]]'' and ''[[Super Mario Sunshine]]''. Performing a [[Spin Jump]] will make the red and blue [[Red-Blue Panel]]s flip over and swap places. [[Chain Chomp|Chomp]]s also appear on the red and blue platforms, along with other enemies, like [[Goomba]]s. A [[Star Bunny]] also makes an appearance here and gives out a hint. | ||
==Planets/Areas== | ==Planets/Areas== | ||
| Line 18: | Line 18: | ||
{{br}} | {{br}} | ||
====Area 1==== | ====Area 1==== | ||
[[File: | [[File:SMG2 Flip Swap Starting Section.png|thumb|200px|Mario in the first area.]] | ||
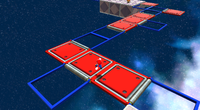
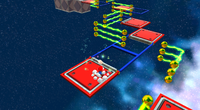
The first area of this galaxy is rather simple. It only consists of a few [[Red-Blue Panel|flipping panels]] that change when the player performs a [[Star Spin]]. The player simply needs to time their spins to reach the other side of the planet. | The first area of this galaxy is rather simple. It only consists of a few [[Red-Blue Panel|flipping panels]] that change when the player performs a [[Star Spin]]. The player simply needs to time their spins to reach the other side of the planet. | ||
{{br}} | {{br}} | ||
====Area 2==== | ====Area 2==== | ||
[[File: | [[File:SMG2 Flip Swap Second Section.png|thumb|200px|left|Mario in the second area.]] | ||
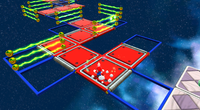
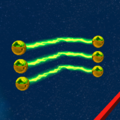
The next area introduces electrified, moving fences. However, these fences move rather slowly, so they should not be a huge nuisance. In the [[Think Before You Shake]] mission, the panels are attached to each other. However, during the [[Purple Coin Flip 'n' Sprint]] mission, the panels are spread apart, more electric fences are added, and the area is larger. The [[Goomba]]s and [[Octoomba]]s on the platform between Area 1 and Area 2 are gone as well during the Purple Coin mission. | The next area introduces electrified, moving fences. However, these fences move rather slowly, so they should not be a huge nuisance. In the [[Think Before You Shake]] mission, the panels are attached to each other. However, during the [[Purple Coin Flip 'n' Sprint]] mission, the panels are spread apart, more electric fences are added, and the area is larger. The [[Goomba]]s and [[Octoomba]]s on the platform between Area 1 and Area 2 are gone as well during the Purple Coin mission. | ||
{{br}} | {{br}} | ||
====Area 3==== | ====Area 3==== | ||
[[File: | [[File:SMG2 Flip Swap Third Section.png|thumb|200px|Mario about to access the third area.]] | ||
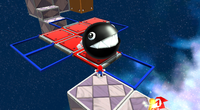
This next area is rather small and the only real hazard featured here is a large [[Chomp]] that rolls around the red panels. During the [[Purple Coin Flip 'n' Sprint]] mission, an electric wire moving back and forth appears on the platform connecting this area with Area 2. | This next area is rather small and the only real hazard featured here is a large [[Chain Chomp|Chomp]] that rolls around the red panels. During the [[Purple Coin Flip 'n' Sprint]] mission, an electric wire moving back and forth appears on the platform connecting this area with Area 2. | ||
{{br}} | {{br}} | ||
====Area 4==== | ====Area 4==== | ||
[[File: | [[File:SMG2 Flip Swap Fourth Section.png|thumb|200px|left|Mario in the fourth area.]] | ||
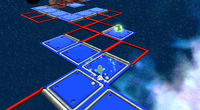
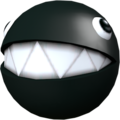
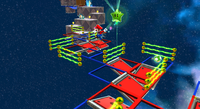
In this area, there are now four sets of Chomps. The area is rather large as well. The [[Comet Medal]] as well as the [[Cosmic Guide]] are also found here. | In this area, there are now four sets of Chomps. The area is rather large as well. The [[Comet Medal]] as well as the [[Cosmic Guide]] are also found here. | ||
{{br}} | {{br}} | ||
====Area 5==== | ====Area 5==== | ||
[[File: | [[File:SMG2 Flip Swap Final Section.png|thumb|200px|Mario in the fifth area.]] | ||
The final area features faster moving electric fences and the panels are also spread out. During the [[Purple Coin Flip 'n' Sprint]] mission, the electric fences are replaced with two fast-moving electric wires that move across two separate sections of the area. | The final area features faster moving electric fences and the panels are also spread out. During the [[Purple Coin Flip 'n' Sprint]] mission, the electric fences are replaced with two fast-moving electric wires that move across two separate sections of the area. | ||
{{br}} | {{br}} | ||
==Enemies== | ==Enemies== | ||
<gallery> | |||
SMG Goomba Model.png|[[Goomba]]s | |||
SMG Asset Model Octooomba.png|[[Octoomba]] | |||
SMG2 Electric Fence Close Up.png|[[Electric rail]]s | |||
SMG Asset Model Chomp.png|[[Chain Chomp|Chomp]]s | |||
</gallery> | |||
==Missions== | ==Missions== | ||
| Line 67: | Line 70: | ||
[[File:SMG2 Flip Swap Green Star 1.png|thumb|200px|Mario about to get the first Green Star.]] | [[File:SMG2 Flip Swap Green Star 1.png|thumb|200px|Mario about to get the first Green Star.]] | ||
This star is found above one of the red platforms in the [[#Area 2|second area]]. The player has to perform a [[Triple Jump]] and [[Spin]] or a well timed [[Somersault|backwards somersault]] and Spin to reach this [[Green Star]]. If the player misses the star, then they can try again if they manage to land on the platforms which will be flipped from the Star Spin. | This star is found above one of the red platforms in the [[#Area 2|second area]]. The player has to perform a [[Triple Jump]] and [[Spin]] or a well timed [[Somersault|backwards somersault]] and Spin to reach this [[Green Star]]. If the player misses the star, then they can try again if they manage to land on the platforms which will be flipped from the Star Spin. | ||
;Planets Visited | |||
<gallery widths="80px" heights="80px"> | |||
SMG2 Flip Swap Starting Section.png|[[Flip-Swap Galaxy#Area 1|Flip-Swap Planet Area 1]] | |||
SMG2 Flip Swap Second Section.png|[[Flip-Swap Galaxy#Area 2|Flip-Swap Planet Area 2]] | |||
</gallery> | |||
;Enemies | ;Enemies | ||
<gallery widths="80px" heights="80px"> | |||
SMG Goomba Model.png|[[Goomba]]s | |||
SMG Asset Model Octooomba.png|[[Octoomba]] | |||
SMG2 Electric Fence Close Up.png|[[Electric rail]]s | |||
</gallery> | |||
{{br}} | {{br}} | ||
====Green Star 2==== | ====Green Star 2==== | ||
[[File:SMG2 Flip Swap Green Star 2.png|thumb|200px|Mario avoiding the Chomp near the second Green Star.]] | [[File:SMG2 Flip Swap Green Star 2.png|thumb|200px|Mario avoiding the Chomp near the second Green Star.]] | ||
This Green Star is found above a red platform where the [[Chomp]]s are rolling around in the [[#Area 4|fourth area]]. The player has to perform a [[Triple Jump]] or a well timed [[Somersault]] to reach it while avoiding the Chomp that spawns nearby. | This Green Star is found above a red platform where the [[Chain Chomp|Chomp]]s are rolling around in the [[#Area 4|fourth area]]. The player has to perform a [[Triple Jump]] or a well timed [[Somersault]] to reach it while avoiding the Chomp that spawns nearby. | ||
;Planets Visited | |||
<gallery widths="80px" heights="80px"> | |||
SMG2 Flip Swap Starting Section.png|[[Flip-Swap Galaxy#Area 1|Flip-Swap Planet Area 1]] | |||
SMG2 Flip Swap Second Section.png|[[Flip-Swap Galaxy#Area 2|Flip-Swap Planet Area 2]] | |||
SMG2 Flip Swap Third Section.png|[[Flip-Swap Galaxy#Area 3|Flip-Swap Planet Area 3]] | |||
SMG2 Flip Swap Fourth Section.png|[[Flip-Swap Galaxy#Area 4|Flip-Swap Planet Area 4]] | |||
</gallery> | |||
;Enemies | ;Enemies | ||
<gallery widths="80px" heights="80px"> | |||
SMG Goomba Model.png|[[Goomba]]s | |||
SMG Asset Model Octooomba.png|[[Octoomba]] | |||
SMG2 Electric Fence Close Up.png|[[Electric rail]]s | |||
SMG Asset Model Chomp.png|[[Chain Chomp|Chomp]]s | |||
</gallery> | |||
{{br}} | {{br}} | ||
==Music== | ==Music== | ||
{{media table | {{media table | ||
| | |file1=Flip Swap Galaxy Theme Super Mario Galaxy 2.oga | ||
|title1=Flip Swap Galaxy | |||
| | |description1=Flip Swap Galaxy theme. Shares music with [[Flip-Out Galaxy]] and [[Cloudy Court Galaxy]]'s [[Cloudy Court Galaxy#Purple Pond Planet|Purple Pond]]. | ||
|description1=Flip Swap Galaxy theme | |length1=0:30 | ||
|length1= | |||
}} | }} | ||
==Prima Official Game Guide description== | |||
*''"After you feed the [[Hungry Luma]] 300 [[Star Bit]]s on the World Map, it flies off and transforms into the Flip-Swap Galaxy. Here, each spin flips platforms back and forth, eliminating old paths while creating new ones. You will be kept on your toes.''" | |||
==Names in other languages== | ==Names in other languages== | ||
| Line 111: | Line 124: | ||
|Spa=Galaxia Vuelta y Vuelta | |Spa=Galaxia Vuelta y Vuelta | ||
|SpaM=Flip and Flip Galaxy | |SpaM=Flip and Flip Galaxy | ||
| | |FreE=Dalles clic-clac | ||
| | |FreEM=Click-clack slabs | ||
|Ita=Galassia Saltescambia | |Ita=Galassia Saltescambia | ||
|ItaM=Jump-and-Swap Galaxy | |ItaM=Jump-and-Swap Galaxy | ||
| Line 122: | Line 135: | ||
|Kor=레드블루패널 갤럭시 | |Kor=레드블루패널 갤럭시 | ||
|KorR=Redeu Beullu Paeneol Gaelleoksi | |KorR=Redeu Beullu Paeneol Gaelleoksi | ||
|KorM=Red-Blue Panel Galaxy}} | |KorM=Red-Blue Panel Galaxy | ||
}} | |||
==Trivia== | ==Trivia== | ||
*There is [[List of Super Mario Galaxy 2 glitches#Flip-Swap Superjump|a glitch]] in this galaxy that lets Mario jump farther than normal. | *There is [[List of Super Mario Galaxy 2 glitches#Flip-Swap Superjump|a glitch]] in this galaxy that lets Mario jump farther than normal. | ||
*The "[[List of Super Mario Odyssey | *The "[[List of Super Mario Odyssey media|Ruins]]" theme heard in some secret areas in ''[[Super Mario Odyssey]]'' uses instrumentation very similar to that of this galaxy's music. | ||
{{SMG2 | {{SMG2 missions}} | ||
[[de:Schüttelklapp-Galaxie]] | [[de:Schüttelklapp-Galaxie]] | ||
[[Category:Cosmic areas]] | |||
[[Category:Galaxies]] | [[Category:Galaxies]] | ||
[[Category:Super Mario Galaxy 2 | [[Category:Super Mario Galaxy 2 locations]] | ||
Revision as of 11:17, January 13, 2024
| Flip-Swap Galaxy | |
|---|---|
| |
| Area | World 1 |
| How to unlock | Get 3 Power Stars, including the first one from Yoshi Star Galaxy, then feed the Hungry Luma on the World 1 map 300 Star Bits |
| Comet(s) | Purple Comet Green Comet |
| Mission(s) | Think Before You Shake Purple Coin Flip 'n' Sprint Green Star 1 Green Star 2 |
| Stars | |
| Galaxy icon | A 2x2 square section of flipping red and blue platforms |
| << >> | |
- “Jump! Spin! Make 'em flip!”
- —Star Bunny, Super Mario Galaxy 2
Flip-Swap Galaxy is a galaxy that appears in Super Mario Galaxy 2. It is located in World 1 and is based on levels from Super Mario Galaxy and Super Mario Sunshine. Performing a Spin Jump will make the red and blue Red-Blue Panels flip over and swap places. Chomps also appear on the red and blue platforms, along with other enemies, like Goombas. A Star Bunny also makes an appearance here and gives out a hint.
Planets/Areas
Flip-Swap Planet
The Flip-Swap Planet is split up into five different areas, each with their own gimmicks and perks.
Area 1
The first area of this galaxy is rather simple. It only consists of a few flipping panels that change when the player performs a Star Spin. The player simply needs to time their spins to reach the other side of the planet.
Area 2
The next area introduces electrified, moving fences. However, these fences move rather slowly, so they should not be a huge nuisance. In the Think Before You Shake mission, the panels are attached to each other. However, during the Purple Coin Flip 'n' Sprint mission, the panels are spread apart, more electric fences are added, and the area is larger. The Goombas and Octoombas on the platform between Area 1 and Area 2 are gone as well during the Purple Coin mission.
Area 3
This next area is rather small and the only real hazard featured here is a large Chomp that rolls around the red panels. During the Purple Coin Flip 'n' Sprint mission, an electric wire moving back and forth appears on the platform connecting this area with Area 2.
Area 4
In this area, there are now four sets of Chomps. The area is rather large as well. The Comet Medal as well as the Cosmic Guide are also found here.
Area 5
The final area features faster moving electric fences and the panels are also spread out. During the Purple Coin Flip 'n' Sprint mission, the electric fences are replaced with two fast-moving electric wires that move across two separate sections of the area.
Enemies
Missions
| Level | Image | Summary |
|---|---|---|
| Think Before You Shake | 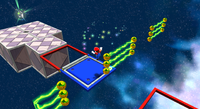
|
This mission's objective is to simply navigate the platforms to reach the end of the galaxy. |
| Purple Coin Flip 'n' Sprint | 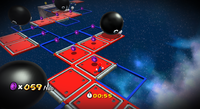
|
This mission's objective is to collect 100 Purple Coins within a time limit. |
Green Stars
Green Star 1
This star is found above one of the red platforms in the second area. The player has to perform a Triple Jump and Spin or a well timed backwards somersault and Spin to reach this Green Star. If the player misses the star, then they can try again if they manage to land on the platforms which will be flipped from the Star Spin.
- Planets Visited
- Enemies
Green Star 2
This Green Star is found above a red platform where the Chomps are rolling around in the fourth area. The player has to perform a Triple Jump or a well timed Somersault to reach it while avoiding the Chomp that spawns nearby.
- Planets Visited
- Enemies
Music
| File info 0:30 |
Prima Official Game Guide description
- "After you feed the Hungry Luma 300 Star Bits on the World Map, it flies off and transforms into the Flip-Swap Galaxy. Here, each spin flips platforms back and forth, eliminating old paths while creating new ones. You will be kept on your toes."
Names in other languages
| Language | Name | Meaning |
|---|---|---|
| Japanese | レッドブルーパネルギャラクシー Reddo Burū Paneru Gyarakushī |
Red-Blue Panel Galaxy |
| Chinese | 紅藍面板銀河 Hónglán miànbǎn yínhé |
Red-Blue Panel Galaxy |
| French (NOE) | Dalles clic-clac |
Click-clack slabs |
| German | Schüttelklapp-Galaxie |
Pun of schütteln (German for shake) and klappen (German for fold). |
| Italian | Galassia Saltescambia |
Jump-and-Swap Galaxy |
| Korean | 레드블루패널 갤럭시 Redeu Beullu Paeneol Gaelleoksi |
Red-Blue Panel Galaxy |
| Spanish | Galaxia Vuelta y Vuelta |
Flip and Flip Galaxy |
Trivia
- There is a glitch in this galaxy that lets Mario jump farther than normal.
- The "Ruins" theme heard in some secret areas in Super Mario Odyssey uses instrumentation very similar to that of this galaxy's music.
