
Level 7-2: Difference between revisions
m (Text replacement - "{{(I|i)talic title\|[^(}\n]+ \(''[^)}\n]+''\)}}" to "{{italic title|id=yes}}") |
m (Text replacement - "''Mario vs. Donkey Kong (Nintendo Switch)''" to "''Mario vs. Donkey Kong'' (Nintendo Switch)") |
||
| (18 intermediate revisions by 6 users not shown) | |||
| Line 1: | Line 1: | ||
{{ | {{level infobox | ||
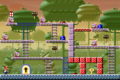
|image=[[File:MarioVsDKSwitch7-2 1.jpg|250px]] | |||
|code=Level 5-2 (GBA)<br>Level 7-2 (Switch) | |||
|image = [[File: | |world=[[Mystic Forest]] | ||
|code= Level 5-2 | |game=''[[Mario vs. Donkey Kong]]''<br>''[[Mario vs. Donkey Kong (Nintendo Switch)|Mario vs. Donkey Kong]]'' ([[Nintendo Switch]]) | ||
|world= [[Mystic Forest]] | |limit=120 (first area)<br>150 (second area) | ||
|game= ''[[Mario vs. Donkey Kong]]'' | |before_alt= | ||
|limit= 120 (first area)<br>150 (second area) | |before=[[Level 7-1|<<]] | ||
| | |after=[[Level 7-3|>>]] | ||
|before= [[Level | |||
|after= [[Level | |||
}} | }} | ||
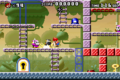
'''Level 5-2''' is the second level of [[Mystic Forest]] in ''[[Mario vs. Donkey Kong]]''. The high score for this level is 29000. | '''Level 7-2''' ('''Level 5-2''' in the GBA version) is the second level of [[Mystic Forest]] in ''[[Mario vs. Donkey Kong]]'' and its [[Mario vs. Donkey Kong (Nintendo Switch)|remake]]. The high score for this level in the original version is 29000. In the [[Nintendo Switch]] remake, the target time for this level's [[Time Attack (Mario vs. Donkey Kong for Nintendo Switch)|Time Attack]] is 62.00. | ||
==Overview== | ==Overview== | ||
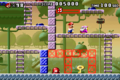
[[File: | [[File:MarioVsDKSwitch7-2 2.jpg|250px|thumb|left|The second area]] | ||
In the GBA version only, the level opens with a cinematic showing [[Mario]] grabbing a [[Hammer]], throwing it upward by pressing {{button|gba|b}}, climbing a ladder, recollecting the Hammer, and then using it to defeat a [[Spear Guy]]. In the remake, this was moved to a [[Help Box]] added in the first area, which now instructs the player to press {{button|switch|x}} to perform a Hammer Toss. | |||
In the first area, the player needs to climb up a series of ladders while also avoiding or defeating the sleeping | In the first area, the player needs to climb up a series of ladders while also avoiding or defeating the sleeping Spear Guys on them, and there are a couple of Hammers the player can use to defeat them. Without pressing the [[Color Switch]]es on the upper platforms, the player needs to grab the upper-most Hammer and use it to defeat the Spear Guy on the platform to the right. The player then needs to press the blue Color Switch on this platform and then jump down to reach a ladder, avoiding or defeating another Spear Guy. At the bottom of the ladder is the [[Key]], and the player needs to press the red Color Switch after collecting it to reach the locked door. | ||
In the second area, the player needs to climb up a [[rope]] to reach an upper platform. Using the [[Monchee]] as a platform, the player can reach another rope to jump onto a platform with a yellow Color Switch. After pressing it, the player needs to jump across the ropes to the left and then hang onto the Monchee above to reach the platform on the far left. While the Monchee is on the yellow platform above, the player needs to press the red Color Switch to cause it to fall. The player then needs to return to the first rope of the area and use the Monchee above to reach a platform on the left. When the Monchee is on the red platform that is above and to the right, the player needs to press the yellow Color Switch to cause the Monchee to fall. The player then needs to press the red Color Switch at the start of the level and then use the two Monchees and ropes to get across a pit of [[Spike Trap|spikes]], followed by using a [[Springboard]] to reach the [[Mini Mario (toy)|Mini-Mario]]. | In the second area, the player needs to climb up a [[rope]] to reach an upper platform. Using the [[Monchee]] as a platform, the player can reach another rope to jump onto a platform with a yellow Color Switch. After pressing it, the player needs to jump across the ropes to the left and then hang onto the Monchee above to reach the platform on the far left. While the Monchee is on the yellow platform above, the player needs to press the red Color Switch to cause it to fall. The player then needs to return to the first rope of the area and use the Monchee above to reach a platform on the left. When the Monchee is on the red platform that is above and to the right, the player needs to press the yellow Color Switch to cause the Monchee to fall. The player then needs to press the red Color Switch at the start of the level and then use the two Monchees and ropes to get across a pit of [[Spike Trap|spikes]], followed by using a [[Springboard]] to reach the [[Mini Mario (toy)|Mini-Mario]]. | ||
In the remake, some minor level design changes were applied to both areas. The first area now has a semisolid red platform above the key replacing two red Color Blocks from the GBA version. An extra red Color Block was also added to the ledge of Color Blocks leading to the Mini-Mario in the second area. | |||
{{br|left}} | {{br|left}} | ||
==Enemies== | ==Enemies== | ||
*[[ | *[[Spear Guy]]s | ||
*[[Monchee]]s | *[[Monchee]]s | ||
==Present locations== | ==Present locations== | ||
*'''Red:''' In the first area, above a high platform to the left with a sleeping | *'''Red:''' In the first area, above a high platform to the left with a sleeping Spear Guy. The blue Color Switch needs to be active in order to defeat the enemy with a Hammer. | ||
*'''Yellow:''' In the second area, between the ropes next to the second Monchee. | *'''Yellow:''' In the second area, between the ropes next to the second Monchee. | ||
*'''Blue:''' In the second area, above the yellow Color Switch above where the player starts. | *'''Blue:''' In the second area, above the yellow Color Switch above where the player starts. | ||
{{MVDK | ==Gallery== | ||
[[Category:Mario vs. Donkey Kong | <gallery> | ||
MVDK_5-2_Part_1_(1).png|First area of Level 5-2 in the GBA version | |||
MVDK_5-2_Part_1_(2).png|First area of Level 5-2 in the GBA version | |||
MVDK 5-2 Part 2 (1).png|Second area of Level 5-2 in the GBA version | |||
MVDK 5-2 Part 2 (2).png|Second area of Level 5-2 in the GBA version | |||
MarioVsDonkeyKong-MysticForest-5-2.png|Map of the first area in the GBA version | |||
</gallery> | |||
{{MVDK levels}} | |||
[[Category:Mario vs. Donkey Kong levels]] | |||
Latest revision as of 21:04, June 22, 2024
| Level | |
|---|---|
| Level 7-2 | |

| |
| Level code | Level 5-2 (GBA) Level 7-2 (Switch) |
| World | Mystic Forest |
| Game | Mario vs. Donkey Kong Mario vs. Donkey Kong (Nintendo Switch) |
| Time limit | 120 (first area) 150 (second area) |
| << Directory of levels >> | |
Level 7-2 (Level 5-2 in the GBA version) is the second level of Mystic Forest in Mario vs. Donkey Kong and its remake. The high score for this level in the original version is 29000. In the Nintendo Switch remake, the target time for this level's Time Attack is 62.00.
OverviewEdit

In the GBA version only, the level opens with a cinematic showing Mario grabbing a Hammer, throwing it upward by pressing ![]() , climbing a ladder, recollecting the Hammer, and then using it to defeat a Spear Guy. In the remake, this was moved to a Help Box added in the first area, which now instructs the player to press
, climbing a ladder, recollecting the Hammer, and then using it to defeat a Spear Guy. In the remake, this was moved to a Help Box added in the first area, which now instructs the player to press ![]() to perform a Hammer Toss.
to perform a Hammer Toss.
In the first area, the player needs to climb up a series of ladders while also avoiding or defeating the sleeping Spear Guys on them, and there are a couple of Hammers the player can use to defeat them. Without pressing the Color Switches on the upper platforms, the player needs to grab the upper-most Hammer and use it to defeat the Spear Guy on the platform to the right. The player then needs to press the blue Color Switch on this platform and then jump down to reach a ladder, avoiding or defeating another Spear Guy. At the bottom of the ladder is the Key, and the player needs to press the red Color Switch after collecting it to reach the locked door.
In the second area, the player needs to climb up a rope to reach an upper platform. Using the Monchee as a platform, the player can reach another rope to jump onto a platform with a yellow Color Switch. After pressing it, the player needs to jump across the ropes to the left and then hang onto the Monchee above to reach the platform on the far left. While the Monchee is on the yellow platform above, the player needs to press the red Color Switch to cause it to fall. The player then needs to return to the first rope of the area and use the Monchee above to reach a platform on the left. When the Monchee is on the red platform that is above and to the right, the player needs to press the yellow Color Switch to cause the Monchee to fall. The player then needs to press the red Color Switch at the start of the level and then use the two Monchees and ropes to get across a pit of spikes, followed by using a Springboard to reach the Mini-Mario.
In the remake, some minor level design changes were applied to both areas. The first area now has a semisolid red platform above the key replacing two red Color Blocks from the GBA version. An extra red Color Block was also added to the ledge of Color Blocks leading to the Mini-Mario in the second area.
EnemiesEdit
Present locationsEdit
- Red: In the first area, above a high platform to the left with a sleeping Spear Guy. The blue Color Switch needs to be active in order to defeat the enemy with a Hammer.
- Yellow: In the second area, between the ropes next to the second Monchee.
- Blue: In the second area, above the yellow Color Switch above where the player starts.
GalleryEdit
First area of Level 5-2 in the GBA version
First area of Level 5-2 in the GBA version
Second area of Level 5-2 in the GBA version
Second area of Level 5-2 in the GBA version
Map of the first area in the GBA version
.png)
.png)
.png)
.png)
