Coma Zone: Difference between revisions
From the Super Mario Wiki, the Mario encyclopedia
Jump to navigationJump to search
LinkTheLefty (talk | contribs) mNo edit summary |
LinkTheLefty (talk | contribs) mNo edit summary |
||
| Line 7: | Line 7: | ||
|after=[[Ice Zone|>>]] | |after=[[Ice Zone|>>]] | ||
}} | }} | ||
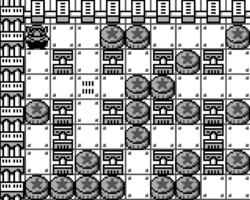
The '''Coma Zone'''<ref>''Wario Blast: Featuring Bomberman!'' instruction booklet, page 11.</ref> is '''Round 5''' of ''[[Wario Blast: Featuring Bomberman!]]'' | The '''Coma Zone'''<ref>''Wario Blast: Featuring Bomberman!'' instruction booklet, page 11.</ref> is '''Round 5''' of ''[[Wario Blast: Featuring Bomberman!]]'', introducing [[Heated Vent]]s. This round contains three stages and a boss fight with [[Thunder Cloud (Wario Blast: Featuring Bomberman!)|Thunder Cloud]]. After defeating the boss, the player obtains [[Moto]]. This is the last round in which the player can receive a [[Special Item (Wario Blast: Featuring Bomberman!)|Special Item]]. | ||
==Appearance== | ==Appearance== | ||
In this round, breakable [[block (Wario Blast: Featuring Bomberman!)|block]]s look like cylinders with a star. | In this round, breakable [[block (Wario Blast: Featuring Bomberman!)|block]]s look like cylinders with a star. | ||
Revision as of 12:00, September 21, 2023
| Coma Zone | |
|---|---|

| |
| Game | Wario Blast: Featuring Bomberman! |
| Level(s) | 4 |
| << List of worlds >> | |
The Coma Zone[1] is Round 5 of Wario Blast: Featuring Bomberman!, introducing Heated Vents. This round contains three stages and a boss fight with Thunder Cloud. After defeating the boss, the player obtains Moto. This is the last round in which the player can receive a Special Item.
Appearance
In this round, breakable blocks look like cylinders with a star.
Objects and differences
Names in other languages
| Language | Name | Meaning | Notes |
|---|---|---|---|
| Italian | Zona Coma[2] | Coma Zone |
References
| Wario Blast: Featuring Bomberman! | |||
|---|---|---|---|
| Characters | Wario • Bomberman • Madbombers | ||
| Bosses | Cup King • Top Man • T-Bear • P-Flower • Thunder Cloud • Pukupuku • Gururin Knight • Mad-Bomber | ||
| Rounds | Normal Zone • Warp Zone • Arrow Zone • Fire Zone • Coma Zone • Ice Zone • Burn Zone • Power Zone | ||
| Normal Items | Explosion Expander • Extra Bomb • Skull | ||
| Special Items | Kicks • Dashin • The Trouncer • Liner • Moto | ||
| Objects | Block (Regenerating Wall) • Bomb • Bomb-Guiding block • Heated Vent • Warp Hole | ||
| Other | Bomberland • Staff • The Battle | ||