Level 1-4 (Mario vs. Donkey Kong): Difference between revisions
No edit summary |
mNo edit summary |
||
| Line 9: | Line 9: | ||
|after=[[Level 1-5 (Mario vs. Donkey Kong)|>>]] | |after=[[Level 1-5 (Mario vs. Donkey Kong)|>>]] | ||
}} | }} | ||
'''Level 1-4''' is the fourth level of [[Mario Toy Company]] in ''[[Mario vs. Donkey Kong]]''. The high score for this level is 28500. In the | '''Level 1-4''' is the fourth level of [[Mario Toy Company]] in ''[[Mario vs. Donkey Kong]]'' and its [[Mario vs. Donkey Kong (Nintendo Switch)|remake]]. The high score for this level in the original version is 28500. In the [[Nintendo Switch]] remake, the target time for this level's [[Time Attack (Mario vs. Donkey Kong for Nintendo Switch)|Time Attack]] is 28.00. | ||
==Overview== | ==Overview== | ||
[[File:MarioVsDKSwitch1-4_2.jpg|250px|thumb|left|The second area]] | [[File:MarioVsDKSwitch1-4_2.jpg|250px|thumb|left|The second area]] | ||
Revision as of 00:50, June 20, 2024
| Level | |
|---|---|
| Level 1-4 | |

| |
| Level code | Level 1-4 |
| World | Mario Toy Company |
| Game | Mario vs. Donkey Kong Mario vs. Donkey Kong (Nintendo Switch) |
| Time limit | 120 (first area) 150 (second area) |
| << Directory of levels >> | |
Level 1-4 is the fourth level of Mario Toy Company in Mario vs. Donkey Kong and its remake. The high score for this level in the original version is 28500. In the Nintendo Switch remake, the target time for this level's Time Attack is 28.00.
Overview

In the GBA version only, the level starts with a cinematic showing Mario crouching under a wall by utilizing a conveyor belt.
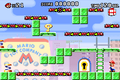
The player starts next to the locked door and a ladder. After climbing the ladder, the player can either use the springs ahead or a Handstand Jump to reach the key. Once the key has been grabbed, the player needs to fall to the bottom conveyor belt, throw the key onto it, crouch to get under the platform, and then pick the key up again on the other side before its timer runs out. The player can then unlock the door to the next area.
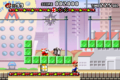
In the second area, the player needs to climb a ladder and grab onto the wire above, avoiding the Wire Trap. By swinging underneath the 1-Up Mushroom and launching after spinning enough times, the player can direct their decent onto the conveyor belt above. By crouching to get under the platform, then performing a Handstand Jump or using the below Wire to reach the above conveyor belts, the player can reach the Mini-Mario.
Enemies
Present locations
- Red: In the first area, above where the player starts. The player has to move against the upper conveyor belts to reach it.
- Yellow: In the second area, to the right of where the player starts. The player needs to move along the first Wire while avoiding the Wire Trap, then crouch under the platform and ride the conveyor belt back to the start to collect it.
- Blue: In the second area, above the highest Wire.
Gallery
The first area of Level 1-4 in the GBA version
The second area of Level 1-4 in the GBA version

