Level 7-3: Difference between revisions
m (Text replacement - "beforealt" to "before_alt") |
m (Text replacement - "''Mario vs. Donkey Kong (Nintendo Switch)''" to "''Mario vs. Donkey Kong'' (Nintendo Switch)") |
||
| (11 intermediate revisions by 3 users not shown) | |||
| Line 1: | Line 1: | ||
{{level infobox | {{level infobox | ||
|image = [[File: | |image = [[File:MarioVsDKSwitch7-3 1.jpg|250px]] | ||
|code= Level 5-3 | |code= Level 5-3 (GBA)<br>Level 7-3 (Switch) | ||
|world= [[Mystic Forest]] | |world= [[Mystic Forest]] | ||
|game= ''[[Mario vs. Donkey Kong]]'' | |game= ''[[Mario vs. Donkey Kong]]''<br>''[[Mario vs. Donkey Kong (Nintendo Switch)|Mario vs. Donkey Kong]]'' ([[Nintendo Switch]]) | ||
|limit= 120 (first area)<br>150 (second area) | |limit= 120 (first area)<br>150 (second area) | ||
|before_alt= | |before_alt= | ||
|before= [[Level | |before= [[Level 7-2|<<]] | ||
|after= [[Level | |after= [[Level 7-4|>>]] | ||
}} | }} | ||
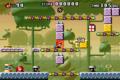
'''Level 5-3''' is the third level of [[Mystic Forest]] in ''[[Mario vs. Donkey Kong]]''. The high score for this level is 27500. | '''Level 7-3''' ('''Level 5-3''' in the GBA version) is the third level of [[Mystic Forest]] in ''[[Mario vs. Donkey Kong]]'' and its [[Mario vs. Donkey Kong (Nintendo Switch)|remake]]. The high score for this level in the original version is 27500. In the [[Nintendo Switch]] remake, the target time for this level's [[Time Attack (Mario vs. Donkey Kong for Nintendo Switch)|Time Attack]] is 66.00. | ||
==Overview== | ==Overview== | ||
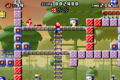
[[File: | [[File:MarioVsDKSwitch7-3 2.jpg|250px|thumb|left|The second area]] | ||
In the GBA version only, the level opens with a cinematic showing [[Mario]] jumping onto a blue [[Color Switch]] to cause a [[Key]] to fall onto the [[Conveyor Belt|conveyor belt]], then jumping onto the [[Direction Switch]] to change the direction of the conveyor and prevent the Key from falling into [[Spike Trap|spikes]]. | |||
In the first area, the player needs to [[crouch]] under a wall to the left and then climb the ladder to find a yellow Color Switch. After pressing it, the player needs to press the Direction Switch to return to the Key and grab it. The player then needs to toss the Key up onto the conveyor belt in the center of the area, and then perform a [[Handstand]] Double Jump below it. Now on the center conveyor belt, the player needs to grab the Key and jump onto the yellow block, then do the next steps in quick succession: The player needs to toss the Key up onto the above conveyor belt, fall onto the Direction Switch below, crouch under the wall to the left, press the Direction Switch and then the red Color Switch, return to the start of the level, climb up the red ladder, and collect the Key. If the player is able to collect the Key before its timer runs out, they can unlock the door to the next area. | In the first area, the player needs to [[crouch]] under a wall to the left and then climb the ladder to find a yellow Color Switch. After pressing it, the player needs to press the Direction Switch to return to the Key and grab it. The player then needs to toss the Key up onto the conveyor belt in the center of the area, and then perform a [[Handstand]] Double Jump below it. Now on the center conveyor belt, the player needs to grab the Key and jump onto the yellow block, then do the next steps in quick succession: The player needs to toss the Key up onto the above conveyor belt, fall onto the Direction Switch below, crouch under the wall to the left, press the Direction Switch and then the red Color Switch, return to the start of the level, climb up the red ladder, and collect the Key. If the player is able to collect the Key before its timer runs out, they can unlock the door to the next area. | ||
In the second area, the player needs to fall into the crevice to the left and wait for a [[Bob-omb]] to approach and clear the [[Bob-omb Block]]s. The player then needs to throw and position another Bob-omb against the Bob-omb Blocks to the left so it blows them up. Once the second set of Bob-omb Blocks have been blown up, the player needs to grab a Bob-omb and use the [[Springboard]] to reach another set of Bob-omb Blocks that need to be blown up on the left, then repeat this process for another set of Bob-omb Blocks on the left to reach the blue Color Switch. With the blue Color Switch pressed, the player needs to climb up to the top platform. Grabbing a Bob-omb up there, the player needs to drop down and throw the Bob-omb onto a group of Bob-omb Blocks on the right. The player then needs to repeat this with the set of Bob-omb Blocks blocking the [[Mini Mario (toy)|Mini-Mario]]. | In the second area, the player needs to fall into the crevice to the left and wait for a [[Bob-omb]] to approach and clear the [[Bob-omb Block]]s. The player then needs to throw and position another Bob-omb against the Bob-omb Blocks to the left so it blows them up. Once the second set of Bob-omb Blocks have been blown up, the player needs to grab a Bob-omb and use the [[Springboard]] to reach another set of Bob-omb Blocks that need to be blown up on the left, then repeat this process for another set of Bob-omb Blocks on the left to reach the blue Color Switch. With the blue Color Switch pressed, the player needs to climb up to the top platform. Grabbing a Bob-omb up there, the player needs to drop down and throw the Bob-omb onto a group of Bob-omb Blocks on the right. The player then needs to repeat this with the set of Bob-omb Blocks blocking the [[Mini Mario (toy)|Mini-Mario]]. | ||
In the remake, the Color Block formations in the east portion of the second area are slightly altered, with a red platform below the blue present replaced with a blue platform, and two formations of red Color Blocks and Bob-omb Blocks completely replaced with two blue Color Blocks and a wall of three red Color Blocks, respectively. | |||
{{br|left}} | {{br|left}} | ||
==Enemies== | ==Enemies== | ||
| Line 26: | Line 27: | ||
*'''Red:''' In the first area, next to the conveyor belt next to the locked door. | *'''Red:''' In the first area, next to the conveyor belt next to the locked door. | ||
*'''Yellow:''' In the second area, high above the blue Color Switch. The player needs to do a Handstand Double Jump from either the blue platform or the center path. | *'''Yellow:''' In the second area, high above the blue Color Switch. The player needs to do a Handstand Double Jump from either the blue platform or the center path. | ||
*'''Blue:''' In the second area, over a red platform over spikes at the top of the area. | *'''Blue:''' In the second area, over a red (blue in the remake) platform over spikes at the top of the area. | ||
==Gallery== | |||
<gallery> | |||
MVDK_5-3_Part_1.png|The first area of Level 5-3 in the GBA version | |||
MVDK_5-3_Part_2.png|The second area of Level 5-3 in the GBA version | |||
</gallery> | |||
{{MVDK | {{MVDK levels}} | ||
[[Category:Mario vs. Donkey Kong levels]] | [[Category:Mario vs. Donkey Kong levels]] | ||
Latest revision as of 20:03, June 22, 2024
| Level | |
|---|---|
| Level 7-3 | |

| |
| Level code | Level 5-3 (GBA) Level 7-3 (Switch) |
| World | Mystic Forest |
| Game | Mario vs. Donkey Kong Mario vs. Donkey Kong (Nintendo Switch) |
| Time limit | 120 (first area) 150 (second area) |
| << Directory of levels >> | |
Level 7-3 (Level 5-3 in the GBA version) is the third level of Mystic Forest in Mario vs. Donkey Kong and its remake. The high score for this level in the original version is 27500. In the Nintendo Switch remake, the target time for this level's Time Attack is 66.00.
Overview[edit]

In the GBA version only, the level opens with a cinematic showing Mario jumping onto a blue Color Switch to cause a Key to fall onto the conveyor belt, then jumping onto the Direction Switch to change the direction of the conveyor and prevent the Key from falling into spikes.
In the first area, the player needs to crouch under a wall to the left and then climb the ladder to find a yellow Color Switch. After pressing it, the player needs to press the Direction Switch to return to the Key and grab it. The player then needs to toss the Key up onto the conveyor belt in the center of the area, and then perform a Handstand Double Jump below it. Now on the center conveyor belt, the player needs to grab the Key and jump onto the yellow block, then do the next steps in quick succession: The player needs to toss the Key up onto the above conveyor belt, fall onto the Direction Switch below, crouch under the wall to the left, press the Direction Switch and then the red Color Switch, return to the start of the level, climb up the red ladder, and collect the Key. If the player is able to collect the Key before its timer runs out, they can unlock the door to the next area.
In the second area, the player needs to fall into the crevice to the left and wait for a Bob-omb to approach and clear the Bob-omb Blocks. The player then needs to throw and position another Bob-omb against the Bob-omb Blocks to the left so it blows them up. Once the second set of Bob-omb Blocks have been blown up, the player needs to grab a Bob-omb and use the Springboard to reach another set of Bob-omb Blocks that need to be blown up on the left, then repeat this process for another set of Bob-omb Blocks on the left to reach the blue Color Switch. With the blue Color Switch pressed, the player needs to climb up to the top platform. Grabbing a Bob-omb up there, the player needs to drop down and throw the Bob-omb onto a group of Bob-omb Blocks on the right. The player then needs to repeat this with the set of Bob-omb Blocks blocking the Mini-Mario.
In the remake, the Color Block formations in the east portion of the second area are slightly altered, with a red platform below the blue present replaced with a blue platform, and two formations of red Color Blocks and Bob-omb Blocks completely replaced with two blue Color Blocks and a wall of three red Color Blocks, respectively.
Enemies[edit]
Present locations[edit]
- Red: In the first area, next to the conveyor belt next to the locked door.
- Yellow: In the second area, high above the blue Color Switch. The player needs to do a Handstand Double Jump from either the blue platform or the center path.
- Blue: In the second area, over a red (blue in the remake) platform over spikes at the top of the area.
Gallery[edit]
The first area of Level 5-3 in the GBA version
The second area of Level 5-3 in the GBA version

