Dreamy Neo Bowser Castle: Difference between revisions
m (Undo revision 4182818 by Drake Inferno (talk)) Tag: Undo |
Tags: Mobile edit Advanced mobile edit |
||
| Line 45: | Line 45: | ||
AntasmaStaticSprite.png|[[Antasma]] (boss; Antasma's Battlefield) | AntasmaStaticSprite.png|[[Antasma]] (boss; Antasma's Battlefield) | ||
</gallery> | </gallery> | ||
==Block locations== | |||
===Area A=== | |||
{|border=1 cellpadding=2 style="text-align: center; border-collapse: collapse; border: 1px solid black; width:100%" | |||
!colspan="3"style="background:orange; height:2em"|[[Dreamy Neo Bowser Castle]] (Koopa Clown Car Dreampoint 1) - 20 Blocks (19 ?, 1 Red Coin) | |||
|-style="background:orange; height:2em" | |||
!Item/s | |||
!Location | |||
!Screenshot | |||
|- | |||
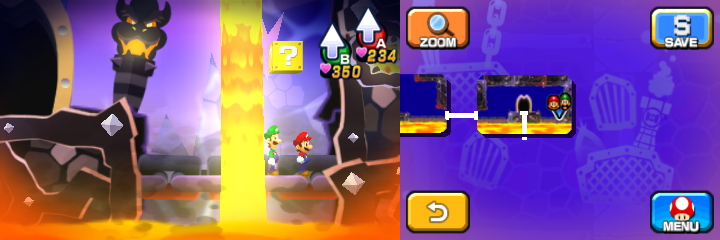
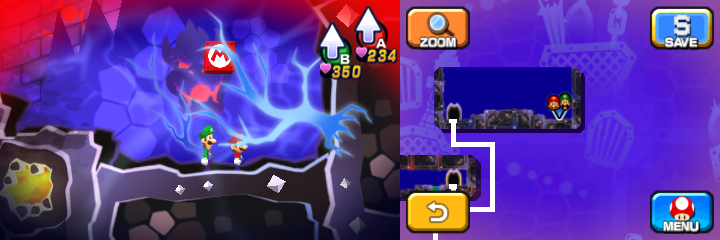
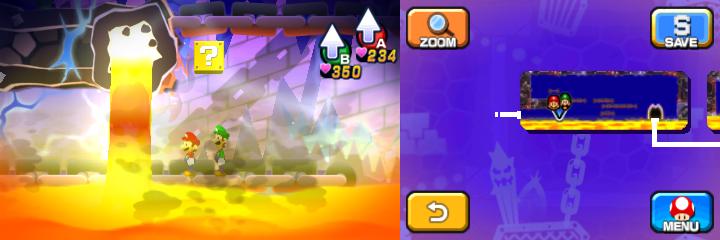
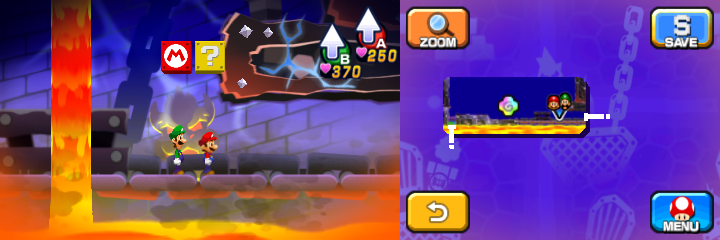
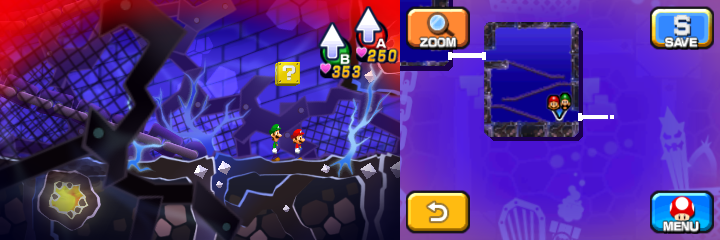
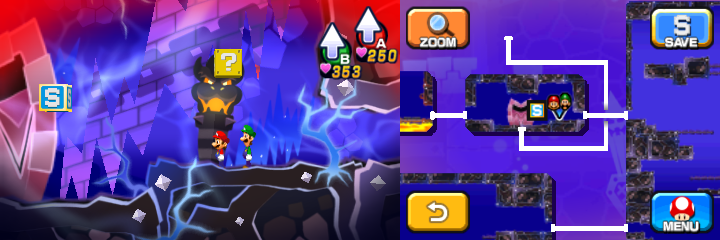
|[[File:MLPJ50Coin.png]] [[File:MLSSBM100Coin.png]] [[File:MLSSBM100Coin.png]]<br>50-Coin (upper right), 100-Coin (rest) | |||
|In the third scene, left of the entrance pipe. Reachable only with [[Luiginary Antigravity]]. | |||
|[[File:Dreamy Neo Bowser Castle (Koopa Clown Car Dreampoint 1) Blocks 1-3.png]] | |||
|- | |||
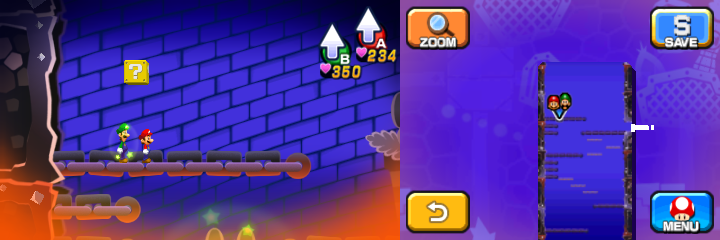
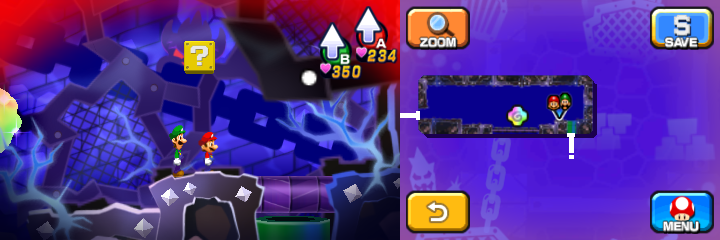
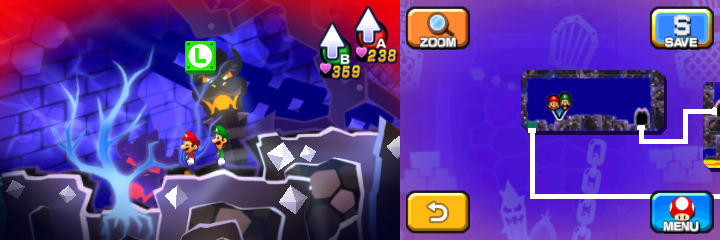
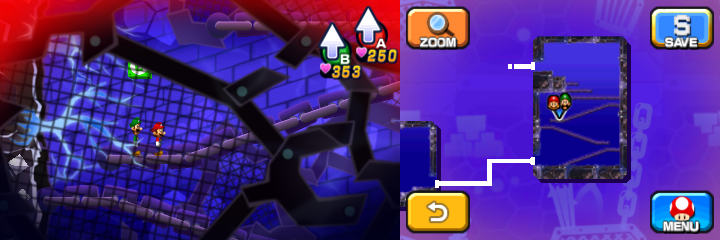
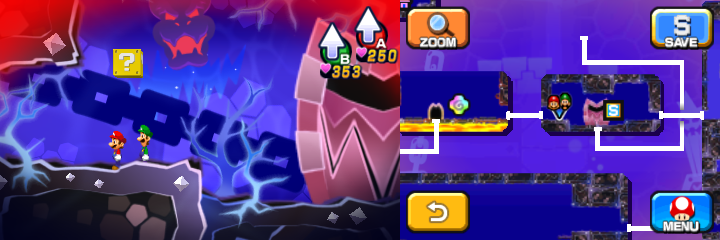
|[[File:MLPJ50Coin.png]] [[File:MLPJ50Coin.png]] [[File:MLSSBMRefreshingHerb.png]]<br>Refreshing Herb (right), 50-Coin (rest) | |||
|Same scene, in the south. Reachable only with Luiginary Antigravity. | |||
|[[File:Dreamy Neo Bowser Castle (Koopa Clown Car Dreampoint 1) Blocks 4-6.png]] | |||
|- | |||
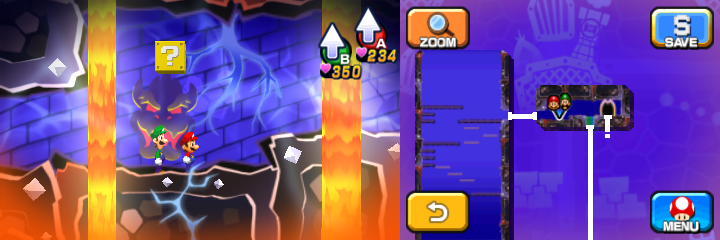
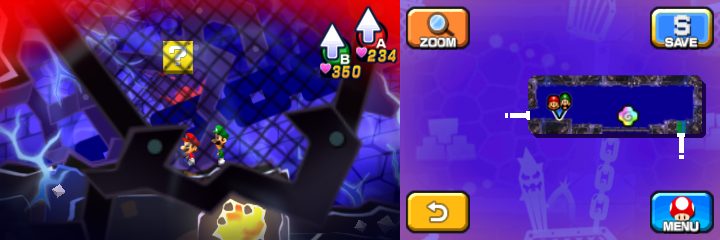
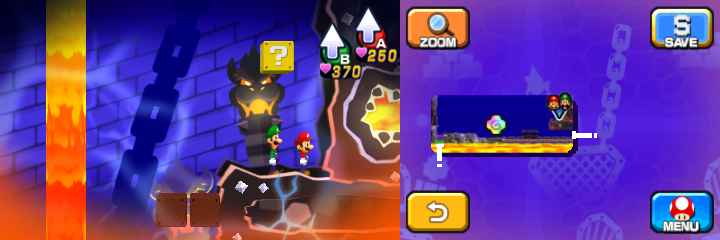
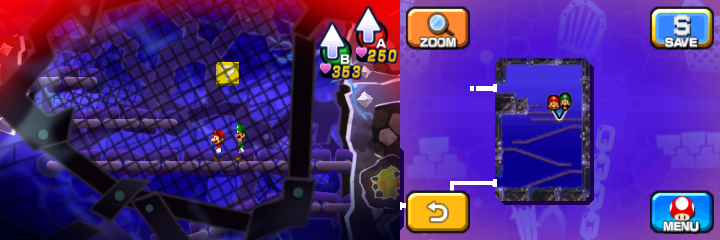
|[[File:M&LDT Candy.png]]<br>Ultra Candy | |||
|Same scene, in the northeast. Reachable only with Luiginary Antigravity. | |||
|[[File:Dreamy Neo Bowser Castle (Koopa Clown Car Dreampoint 1) Block 7.png]] | |||
|- | |||
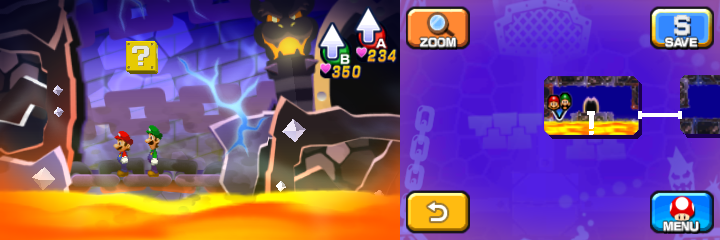
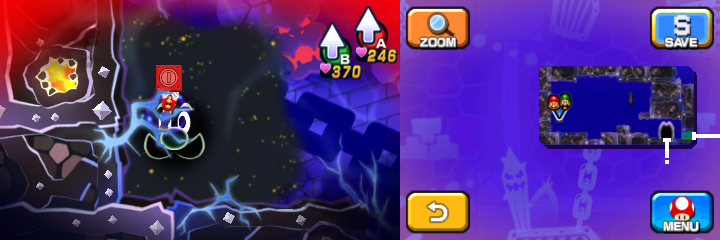
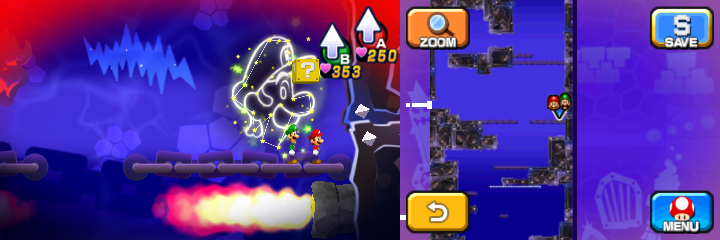
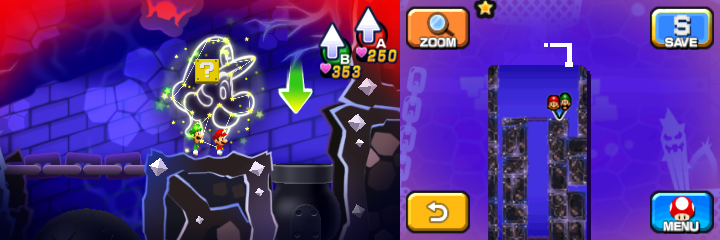
|[[File:Red Coin SMR.png|21px]][[File:Red Coin SMR.png|21px]][[File:Red Coin SMR.png|21px]][[File:Red Coin SMR.png|21px]][[File:Red Coin SMR.png|21px]][[File:Red Coin SMR.png|21px]][[File:Red Coin SMR.png|21px]][[File:Red Coin SMR.png|21px]] 44x[[File:Dream Team Coin.png]]<br>8 Red Coins and 44 Coins | |||
|In the fourth scene, near the exit. Reachable only with Luiginary Antigravity. | |||
|[[File:Dreamy Neo Bowser Castle (Koopa Clown Car Dreampoint 1) Block 8.png]] | |||
|- | |||
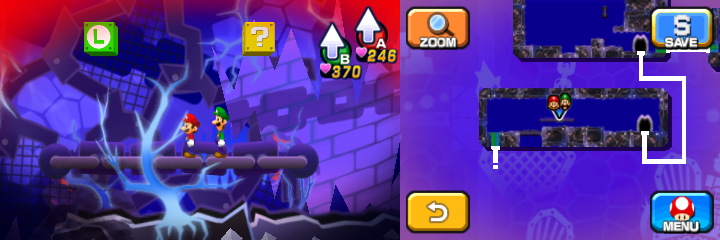
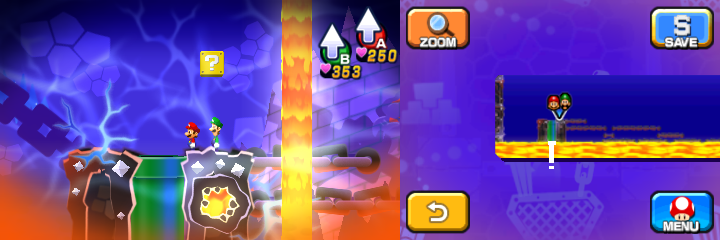
|[[File:M&LDT Nut.png]]<br>Max Nut | |||
|In the fifth scene, in the southwest. Reachable only with Luiginary Antigravity. | |||
|[[File:Dreamy Neo Bowser Castle (Koopa Clown Car Dreampoint 1) Block 9.png]] | |||
|- | |||
|[[File:M&LDT Mushroom.png]]<br>Max Mushroom | |||
|Same scene, in the southeast. Reachable only with Luiginary Antigravity. | |||
|[[File:Dreamy Neo Bowser Castle (Koopa Clown Car Dreampoint 1) Block 10.png]] | |||
|- | |||
|[[File:MLSSBM100Coin.png]]<br>100-Coin | |||
|Same scene, in the northeast. Reachable only with Luiginary Antigravity. | |||
|[[File:Dreamy Neo Bowser Castle (Koopa Clown Car Dreampoint 1) Block 11.png]] | |||
|- | |||
|[[File:MLPJ50Coin.png]]<br>50-Coin | |||
|In the sixth scene, near the entrance. | |||
|[[File:Dreamy Neo Bowser Castle (Koopa Clown Car Dreampoint 1) Block 12.png]] | |||
|- | |||
|[[File:MLPJ50Coin.png]]<br>50-Coin | |||
|Same scene, above the upper middle platform. | |||
|[[File:Dreamy Neo Bowser Castle (Koopa Clown Car Dreampoint 1) Block 13.png]] | |||
|- | |||
|[[File:M&LDT Mushroom.png]]<br>Ultra Mushroom | |||
|Same scene, above the right platform. | |||
|[[File:Dreamy Neo Bowser Castle (Koopa Clown Car Dreampoint 1) Block 14.png]] | |||
|- | |||
|[[File:M&LDT Syrup.png]]<br>Max Syrup Jar | |||
|In the second scene, in the part reachable only from previous scene. | |||
|[[File:Dreamy Neo Bowser Castle (Koopa Clown Car Dreampoint 1) Block 15.png]] | |||
|- | |||
|[[File:MLSSBM100Coin.png]]<br>100-Coin | |||
|In the seventh scene, in the middle. Reachable only with Luiginary Antigravity. | |||
|[[File:Dreamy Neo Bowser Castle (Koopa Clown Car Dreampoint 1) Block 16.png]] | |||
|- | |||
|[[File:M&LDT Candy.png]]<br>Max Candy | |||
|Same scene, in the northeast. Reachable only with Luiginary Antigravity. | |||
|[[File:Dreamy Neo Bowser Castle (Koopa Clown Car Dreampoint 1) Block 17.png]] | |||
|- | |||
|[[File:M&LDT Nut.png]]<br>Ultra Nut | |||
|In the second scene, in the middle of the main part. Reachable only with Luiginary Antigravity. | |||
|[[File:Dreamy Neo Bowser Castle (Koopa Clown Car Dreampoint 1) Block 18.png]] | |||
|- | |||
|[[File:M&LDT Mushroom.png]]<br>Max Mushroom | |||
|Same scene, in the southeast of the main part. | |||
|[[File:Dreamy Neo Bowser Castle (Koopa Clown Car Dreampoint 1) Block 19.png]] | |||
|- | |||
|[[File:MLSSBM100Coin.png]]<br>100-Coin | |||
|In the eighth part, near the exit pipe. | |||
|[[File:Dreamy Neo Bowser Castle (Koopa Clown Car Dreampoint 1) Block 20.png]] | |||
|} | |||
===Area B=== | |||
{|border=1 cellpadding=2 style="text-align: center; border-collapse: collapse; border: 1px solid black; width:100%" | |||
!colspan="3"style="background:orange; height:2em"|Dreamy Neo Bowser Castle (Koopa Clown Car Dreampoint 2) - 4 Blocks (3 ?, 1 M) | |||
|-style="background:orange; height:2em" | |||
!Item/s | |||
!Location | |||
!Screenshot | |||
|- | |||
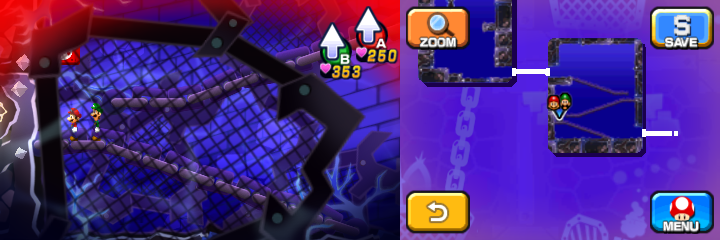
|[[File:M&LDT Candy.png]]<br>Max Candy | |||
|In the second scene, in the east. | |||
|[[File:Dreamy Neo Bowser Castle (Koopa Clown Car Dreampoint 2) Block 1.png]] | |||
|- | |||
|[[File:M&LDT Candy.png]]<br>Max Candy | |||
|In the third scene, at the very top. | |||
|[[File:Dreamy Neo Bowser Castle (Koopa Clown Car Dreampoint 2) Block 2.png]] | |||
|- | |||
|[[File:MLSSBM100Coin.png]]<br>100-Coin | |||
|In the fourth scene, near the entrance. | |||
|[[File:Dreamy Neo Bowser Castle (Koopa Clown Car Dreampoint 2) Block 3.png]] | |||
|- | |||
|[[File:M&LDT Syrup.png]]<br>Ultrasyrup Jar | |||
|In the fifth scene, at the end. | |||
|[[File:Dreamy Neo Bowser Castle (Koopa Clown Car Dreampoint 2) Block 4.png]] | |||
|} | |||
===Area C=== | |||
{|border=1 cellpadding=2 style="text-align: center; border-collapse: collapse; border: 1px solid black; width:100%" | |||
!colspan="3"style="background:orange; height:2em"|Dreamy Neo Bowser Castle (Koopa Clown Car Dreampoint 3) - 5 Blocks (4 ?, 1 L) | |||
|-style="background:orange; height:2em" | |||
!Item/s | |||
!Location | |||
!Screenshot | |||
|- | |||
|[[File:MLPJ50Coin.png]][[File:MLPJ50Coin.png]][[File:MLPJ50Coin.png]][[File:MLPJ50Coin.png]][[File:MLPJ50Coin.png]][[File:MLPJ50Coin.png]][[File:MLPJ50Coin.png]][[File:MLPJ50Coin.png]][[File:MLPJ50Coin.png]][[File:MLPJ50Coin.png]]<br>10 50-Coins | |||
|In the first scene, right of the Dream Portal. | |||
|[[File:Dreamy Neo Bowser Castle (Koopa Clown Car Dreampoint 3) Block 1.png]] | |||
|- | |||
|[[File:MLPJ50Coin.png]]<br>50-Coin | |||
|Same scene, near the west exit. | |||
|[[File:Dreamy Neo Bowser Castle (Koopa Clown Car Dreampoint 3) Block 2.png]] | |||
|- | |||
|[[File:MLSSBMRefreshingHerb.png]]<br>Refreshing Herb | |||
|In the second scene, in the west. | |||
|[[File:Dreamy Neo Bowser Castle (Koopa Clown Car Dreampoint 3) Block 3.png]] | |||
|- | |||
|[[File:M&LDT Syrup.png]]<br>Ultrasyrup Jar | |||
|In the third scene, near the exit, under the platforms. | |||
|[[File:Dreamy Neo Bowser Castle (Koopa Clown Car Dreampoint 3) Block 4.png]] | |||
|- | |||
|[[File:Dream Team Boots.png]]<br>Dark Boots | |||
|In the fifth scene, right of the exit pipe. | |||
|[[File:Dreamy Neo Bowser Castle (Koopa Clown Car Dreampoint 3) Block 5.png]] | |||
|} | |||
===Area D=== | |||
{|border=1 cellpadding=2 style="text-align: center; border-collapse: collapse; border: 1px solid black; width:100%" | |||
!colspan="3"style="background:orange; height:2em"|Dreamy Neo Bowser Castle (Koopa Clown Car Dreampoint 4) - 3 Blocks (1 ?, 1 L, 1 Red Coin) | |||
|-style="background:orange; height:2em" | |||
!Item/s | |||
!Location | |||
!Screenshot | |||
|- | |||
|[[File:Red Coin SMR.png|21px]][[File:Red Coin SMR.png|21px]][[File:Red Coin SMR.png|21px]][[File:Red Coin SMR.png|21px]][[File:Red Coin SMR.png|21px]][[File:Red Coin SMR.png|21px]][[File:Red Coin SMR.png|21px]][[File:Red Coin SMR.png|21px]]<br>8 Red Coins | |||
|In the second scene, in the west. Reachable only with Luiginary Antigravity. | |||
|[[File:Dreamy Neo Bowser Castle (Koopa Clown Car Dreampoint 4) Block 1.png]] | |||
|- | |||
|[[File:MLSSBM100Coin.png]] [[File:MLSSBMRefreshingHerb.png]]<br>100-Coin, Refreshing Herb | |||
|In the third scene, above the platform. | |||
|[[File:Dreamy Neo Bowser Castle (Koopa Clown Car Dreampoint 4) Blocks 2-3.png]] | |||
|} | |||
===Area E=== | |||
{|border=1 cellpadding=2 style="text-align: center; border-collapse: collapse; border: 1px solid black; width:100%" | |||
!colspan="3"style="background:orange; height:2em"|Dreamy Neo Bowser Castle (Dark Stone Platform Dreampoint 1) - 1 ? Block | |||
|-style="background:orange; height:2em" | |||
!Item/s | |||
!Location | |||
!Screenshot | |||
|- | |||
|[[File:M&LDT Nut.png]]<br>Max Nut | |||
|In the second scene, near the exit. | |||
|[[File:Dreamy Neo Bowser Castle (Dark Stone Platform Dreampoint 1) Block.png]] | |||
|} | |||
===Area F=== | |||
{|border=1 cellpadding=2 style="text-align: center; border-collapse: collapse; border: 1px solid black; width:100%" | |||
!colspan="3"style="background:orange; height:2em"|Dreamy Neo Bowser Castle (Dark Stone Platform Dreampoint 2) - 3 Blocks (2 ?, 1 M) | |||
|-style="background:orange; height:2em" | |||
!Item/s | |||
!Location | |||
!Screenshot | |||
|- | |||
|[[File:MLSSBM100Coin.png]] [[File:MLPJ50Coin.png]]<br>100-Coin, 50-Coin | |||
|In the first scene, near the east exit. | |||
|[[File:Dreamy Neo Bowser Castle (Dark Stone Platform Dreampoint 2) Blocks 1-2.png]] | |||
|- | |||
|[[File:M&LDT Nut.png]]<br>Max Nut | |||
|Same scene, above the previous two. | |||
|[[File:Dreamy Neo Bowser Castle (Dark Stone Platform Dreampoint 2) Block 3.png]] | |||
|} | |||
===Area G=== | |||
{|border=1 cellpadding=2 style="text-align: center; border-collapse: collapse; border: 1px solid black; width:100%" | |||
!colspan="3"style="background:orange; height:2em"|Dreamy Neo Bowser Castle (Bowser Dreampoint) - 9 Blocks (7 ?, 1 M, 1 L) | |||
|-style="background:orange; height:2em" | |||
!Item/s | |||
!Location | |||
!Screenshot | |||
|- | |||
|[[File:M&LDT Mushroom.png]]<br>Max Mushroom | |||
|In the second scene, near the exit pipe. | |||
|[[File:Dreamy Neo Bowser Castle (Bowser Dreampoint) Block 1.png]] | |||
|- | |||
|[[File:M&LDT Secret Box.png]]<br>Secret Box | |||
|In the fourth scene, in the middle. | |||
|[[File:Dreamy Neo Bowser Castle (Bowser Dreampoint) Block 2.png]] | |||
|- | |||
|[[File:MLSSBM100Coin.png]][[File:MLSSBM100Coin.png]][[File:MLSSBM100Coin.png]][[File:MLSSBM100Coin.png]][[File:MLSSBM100Coin.png]][[File:MLSSBM100Coin.png]][[File:MLSSBM100Coin.png]][[File:MLSSBM100Coin.png]][[File:MLSSBM100Coin.png]][[File:MLSSBM100Coin.png]]<br>10 100-Coins | |||
|Same scene, near the exit. | |||
|[[File:Dreamy Neo Bowser Castle (Bowser Dreampoint) Block 3.png]] | |||
|- | |||
|[[File:MLPJ50Coin.png]][[File:MLPJ50Coin.png]][[File:MLPJ50Coin.png]][[File:MLPJ50Coin.png]][[File:MLPJ50Coin.png]][[File:MLPJ50Coin.png]][[File:MLPJ50Coin.png]][[File:MLPJ50Coin.png]][[File:MLPJ50Coin.png]][[File:MLPJ50Coin.png]]<br>10 50-Coins | |||
|In the sixth scene, in the middle. | |||
|[[File:Dreamy Neo Bowser Castle (Bowser Dreampoint) Block 4.png]] | |||
|- | |||
|[[File:M&LDT Nut.png]]<br>Max Nut | |||
|Same scene, above the first straight platform. | |||
|[[File:Dreamy Neo Bowser Castle (Bowser Dreampoint) Block 5.png]] | |||
|- | |||
|[[File:M&LDT Candy.png]]<br>Max Candy | |||
|In the ninth scene, above the right middle platform. | |||
|[[File:Dreamy Neo Bowser Castle (Bowser Dreampoint) Block 6.png]] | |||
|- | |||
|[[File:MLSSBM100Coin.png]]<br>100-Coin | |||
|In the tenth scene (east of the first scene), near the entrance. | |||
|[[File:Dreamy Neo Bowser Castle (Bowser Dreampoint) Block 7.png]] | |||
|- | |||
|[[File:M&LDT Syrup.png]]<br>Max Syrup Jar | |||
|Same scene, near the west exit. | |||
|[[File:Dreamy Neo Bowser Castle (Bowser Dreampoint) Block 8.png]] | |||
|- | |||
|[[File:M&LDT Candy.png]]<br>Max Candy | |||
|In the eleventh scene, at the very top, before the cannon. | |||
|[[File:Dreamy Neo Bowser Castle (Bowser Dreampoint) Block 9.png]] | |||
|} | |||
==Names in other languages== | ==Names in other languages== | ||
Revision as of 20:00, July 21, 2024
| Dreamy Neo Bowser Castle | |
|---|---|
| |
| First appearance | Mario & Luigi: Dream Team (2013) |
| Greater location | Dream World |
| Inhabitants | Kamek, Mechakoopas, Big Tail Goombas, Antasmen, Lakitus R, Spinies R, Gold Beanies |
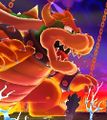
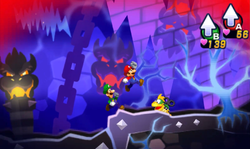
Dreamy Neo Bowser Castle is the Dream World version of Neo Bowser Castle in Mario & Luigi: Dream Team. It is the last dream area in the game. Kamek is fought three times here, along with Antasma and Bowser.
As Mario and Luigi storm Neo Bowser Castle, they find Kamek who uses his magic to scramble the doorways to hinder the brothers' progress. Antasma then appears and creates a Dream World Portal of his own which Kamek retreats into. By pressing a switch that lowers a gate that allows access to a hovering Koopa Clown Car which Luigi can sleep on, Mario enters the dream world where he works his way and confronts Kamek. After fighting him, however, Kamek retreats and leaves the dream world where he continues to use his magic to scramble the castle's doorways in the real world. Mario and Luigi make their way to Kamek (with Mario fighting him in the dream world) two more times the same way, the third time with Kamek being defeated. With Kamek no longer in the brothers' way, they work their way to the castle's main hall where they are stopped by intense dark flames that are being spewed from dream world portals, which they then extinguish by destroying the flamethrowers within the dream worlds. Past the main hallway, the Bros. see Bowser sleeping in a strange power device and being protected by a barrier. By having Prince Dreambert bind himself to the vines connecting to the power source, Mario and Dreamy Luigi work their way through the final dream area, Bowser's Dream, where they confront Dreamy Bowser in the final Giant Battle. After defeating Bowser in the dream world, he wakes up, causing the cessation of dream energy to the castle.
Antasma is later battled in the dream world, the only section of the game that takes place in a dreamy version of the outdoor/rooftop version of Neo Bowser Castle.
Dream Worlds
- Area A: A Dream World where Kamek is fought for the first time, which is required to clear the spell on the doorways in the first floor of Neo Bowser Castle. It is only accessible after lowering the metal gate that surrounds the hovering Koopa Clown Car that Luigi can sleep on. This dream world is where Mario learns Luiginary Antigravity.
- Area B: A Dream World where Kamek is fought for the second time, which is required to clear the spell on the doorways in the second floor of Neo Bowser Castle. It is only accessible after lowering the metal gate that surrounds the Koopa Clown Car. This dream world primarily makes use of the Luiginary Stache Tree.
- Area C: A Dream World where Kamek is fought for the last time, which is required to clear the spell on the doorway to the third floor, in the second floor of Neo Bowser Castle. This dream world is located at the end of the castle's second area. It is only accessible after lowering the metal gate that surrounds the Koopa Clown Car. This dream world primarily uses the Luiginary Propeller.
- Area D: A Dream World where a flamethrower that hinders progress through the castle's third area is found. Located on the west side of the hallway, at the hovering Koopa Clown Car. This dream world uses Luiginary Antigravity.
- Area E: A Dream World where a flamethrower that hinders progress through the castle's third area is found. Located on the front-east side of the hallway, at the Dreampoint. This dream world incorporates the Luiginary Speedometer.
- Area F: A Dream World where a flamethrower that hinders progress through the castle's third area is found. Located on the back-east side of the hallway, at the Dreampoint. This dream world is where the Luiginary Cylinder is used.
- Area G (Bowser's Dream): The final Dreampoint where Bowser sleeps to provide power to the castle. It is located in the fourth area. A Dream World version of Bowser serves as the final giant Boss. A shop run by Dreamy Broque Monsieur is located here.
- Antasma's Battlefield: Not technically a part of Dreamy Neo Bowser Castle, this dream world created by Antasma is where Mario and Luigi fight the bat king. It is located in the fourth area of the castle.
Enemies
Mechakoopas (Areas A, B, D, F)
Big Tail Goombas (Areas B, D, F, G)
Antasmen (Areas C, D, E, G)
Lakitus R (Areas A, B, D, E, G)
Spinies R (Areas A, B, D, E, G)
Gold Beanies (Areas A-G)
Kamek (boss, fought three times; Areas A, B, C)
Bowser (giant boss; Area G)
Antasma (boss; Antasma's Battlefield)
Block locations
Area A
| Dreamy Neo Bowser Castle (Koopa Clown Car Dreampoint 1) - 20 Blocks (19 ?, 1 Red Coin) | ||
|---|---|---|
| Item/s | Location | Screenshot |
50-Coin (upper right), 100-Coin (rest) |
In the third scene, left of the entrance pipe. Reachable only with Luiginary Antigravity. | 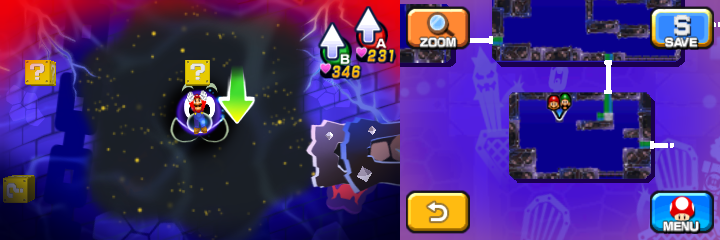
|
Refreshing Herb (right), 50-Coin (rest) |
Same scene, in the south. Reachable only with Luiginary Antigravity. | 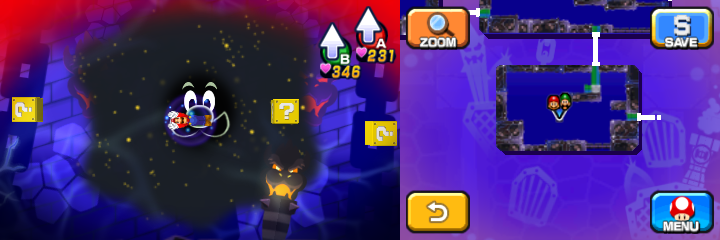
|
Ultra Candy |
Same scene, in the northeast. Reachable only with Luiginary Antigravity. | 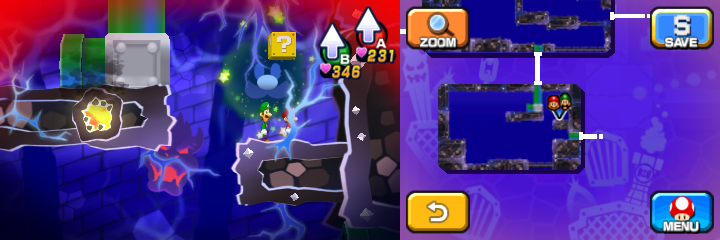
|
8 Red Coins and 44 Coins |
In the fourth scene, near the exit. Reachable only with Luiginary Antigravity. | 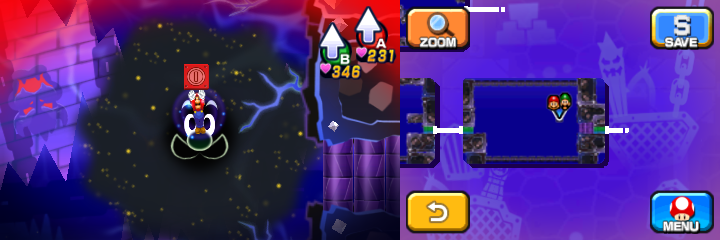
|
Max Nut |
In the fifth scene, in the southwest. Reachable only with Luiginary Antigravity. | 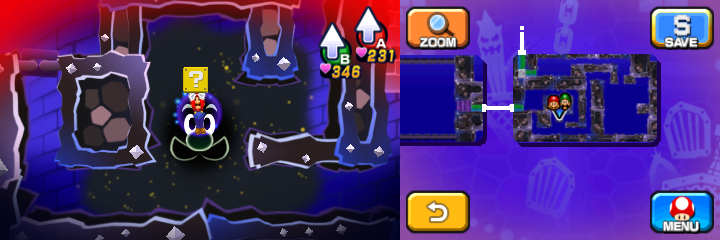
|
Max Mushroom |
Same scene, in the southeast. Reachable only with Luiginary Antigravity. | 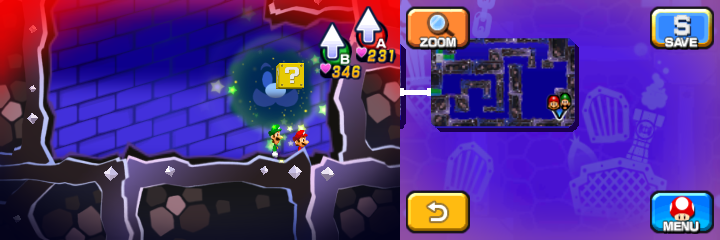
|
100-Coin |
Same scene, in the northeast. Reachable only with Luiginary Antigravity. | 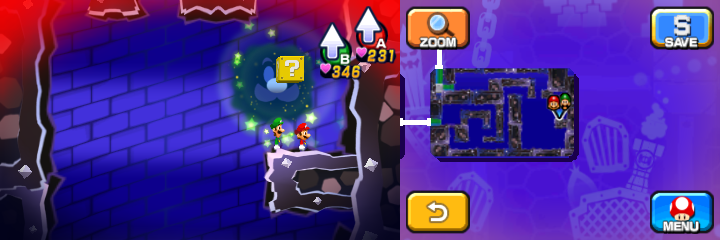
|
50-Coin |
In the sixth scene, near the entrance. | 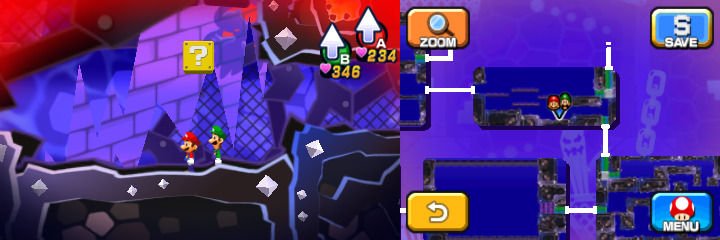
|
50-Coin |
Same scene, above the upper middle platform. | 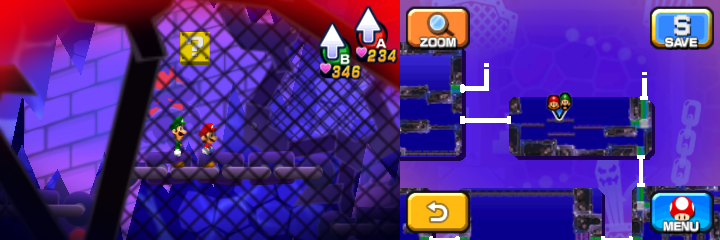
|
Ultra Mushroom |
Same scene, above the right platform. | 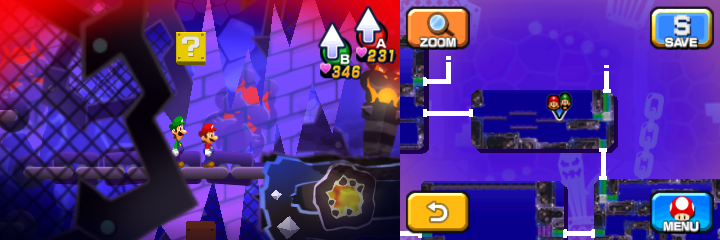
|
Max Syrup Jar |
In the second scene, in the part reachable only from previous scene. | 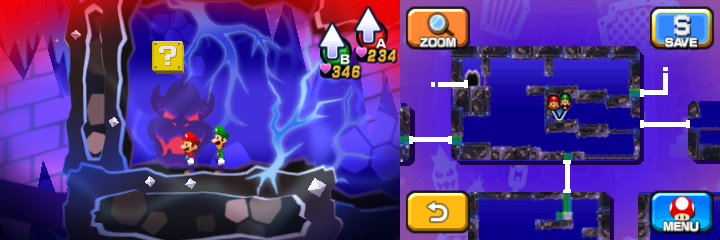
|
100-Coin |
In the seventh scene, in the middle. Reachable only with Luiginary Antigravity. | 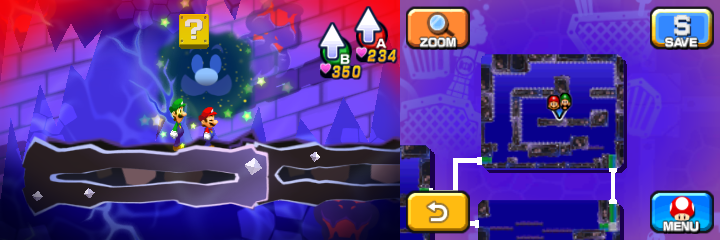
|
Max Candy |
Same scene, in the northeast. Reachable only with Luiginary Antigravity. | 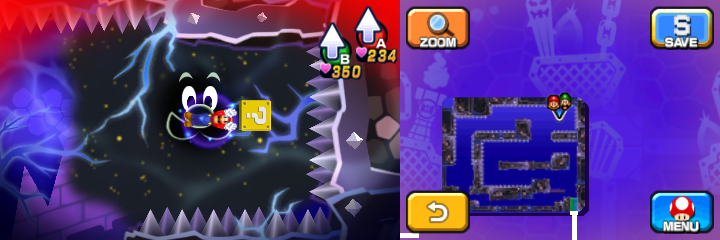
|
Ultra Nut |
In the second scene, in the middle of the main part. Reachable only with Luiginary Antigravity. | 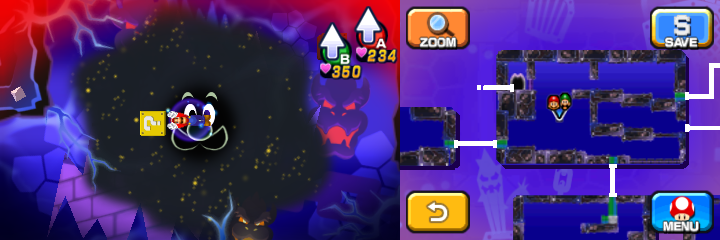
|
Max Mushroom |
Same scene, in the southeast of the main part. | 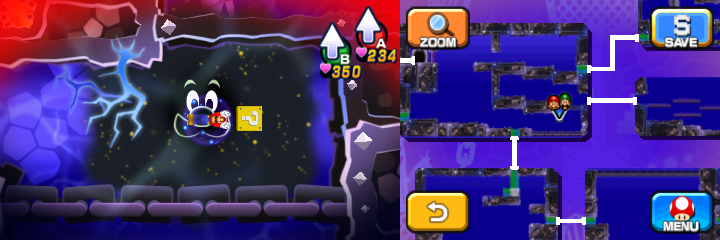
|
100-Coin |
In the eighth part, near the exit pipe. | 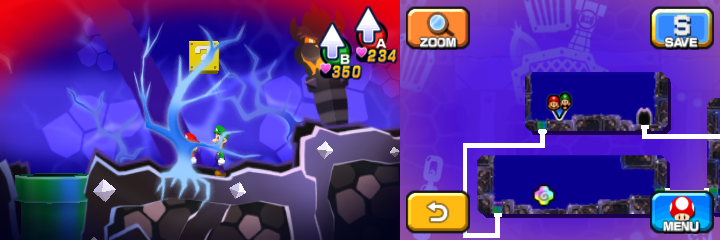
|
Area B
Area C
Area D
Area E
| Dreamy Neo Bowser Castle (Dark Stone Platform Dreampoint 1) - 1 ? Block | ||
|---|---|---|
| Item/s | Location | Screenshot |
Max Nut |
In the second scene, near the exit. | 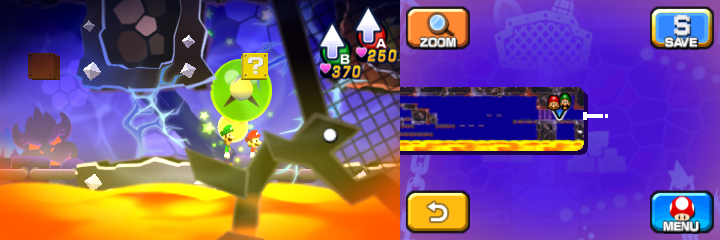
|
Area F
Area G
Names in other languages
| Language | Name | Meaning | Notes |
|---|---|---|---|
| Japanese | 夢のネオクッパ城[?] Yume no Neo Kuppa Jō |
Neo Bowser Castle of Dreams | |
| French (NOA) | Château noir de Bowser rêve[?] | Dreamy Bowser's Black Castle | |
| French (NOE) | Néobowserium onirique[?] | Oneiric Neobowserium | |
| German | Bowsers neue Festung[?] | Bowser's new fortress | |
| Italian | Neo-Castello di Bowser onirico[?] | Dreamy Neo Bowser Castle | |
| Spanish (NOA) | Neocastillo de Bowser onírico[?] | Dreamy Neo Bowser castle | |
| Spanish (NOE) | Supercastillo de Bowser en sueños[?] | Neo Bowser Castle in dreams |


