World 8-Bowser's Castle (Super Mario Bros. 3): Difference between revisions
TheRaoul1992 (talk | contribs) |
|||
| (47 intermediate revisions by 21 users not shown) | |||
| Line 1: | Line 1: | ||
{{italic title| | {{italic title|id=yes}} | ||
{{ | {{level infobox | ||
|title={{world|8|bowser3}} | |title={{world|8|bowser3}} | ||
|image=[[File: | |image=[[File:SMAS SMB3 World 8-BC Screenshot.png|256px]] | ||
|code=World 8-Bowser's Castle | |code=World 8-Bowser's Castle | ||
|world=[[Dark Land]] | |world=[[Dark Land]] | ||
| Line 8: | Line 8: | ||
|limit=400 seconds | |limit=400 seconds | ||
|boss=[[Bowser]] | |boss=[[Bowser]] | ||
| | |before_alt= | ||
|before=[[World 8-Super Tank|<<]] | |before=[[World 8-Super Tank|<<]] | ||
|after= | |after= | ||
| Line 16: | Line 15: | ||
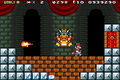
'''{{world|8|bowser3}}''' is the eleventh and final level of [[Dark Land]] in ''[[Super Mario Bros. 3]]'', and is the final level in the game. It becomes accessible after the player clears {{world-link|8|tank3|World 8-Super Tank}}. | '''{{world|8|bowser3}}''' is the eleventh and final level of [[Dark Land]] in ''[[Super Mario Bros. 3]]'', and is the final level in the game. It becomes accessible after the player clears {{world-link|8|tank3|World 8-Super Tank}}. | ||
== Layout == | ==Layout== | ||
The player starts next to a trio of [[ | [[File:SMA4 SMB3 Bowser's Castle.png|thumb|left|200px|The Bowser Statues]] | ||
The player starts next to a trio of [[Bowser Statue]]s, which will fire lasers when the player approaches. At the top of a set of stairs is an invisible lift that will start rising when the player steps onto it; if the player misses the lift, they can enter the nearby door and then move left, avoiding [[Dry Bones]], to another door to be brought back to the beginning of the castle to try again. Once the lift reaches its peak, the player will find a [[Donut Block|Donut Lift]] to the right and must ride it down, jumping off to the right when able before the block falls into the abyss. After passing a [[Hot Foot]], the player will have to jump up stairs lined with three [[Roto-Disc]]s, then fall down the next set of stairs avoiding the same Roto-Discs. A [[1-Up Mushroom]] can also be collected at the top of the stairs, next to the wall on the right. Next, the player has to jump across several Donut Lift platforms while avoiding [[Lava Bubble|Podoboo]]s and falling in the [[lava]] below. At the end of this area, the path splits in four ways, with the second from the top path having a power-up and the bottom-most path leading back to the start of the castle. The other two paths lead to [[Bowser]]. | |||
If the player takes the top path, they will have to jump over four | If the player takes the top path, they will have to jump over four Bowser Statues. Afterward, they must jump across Donut Lift platforms while avoiding Bowser's [[Fire Breath]], along with avoiding one more Bowser Statue above. If the player takes the path second from the bottom, they will first have to avoid a sliding [[Thwomp]] and ride a Donut Lift downward to other platforms they have to jump across, while avoiding a Roto-Disc. Then the player has to navigate Bowser Statues set up on sets of stairs, and a power-up is placed in the center of this room. After the Bowser Statues are platforms over lava the player has to jump across while avoiding Bowser's Fire Breath and one more Bowser Statue above. The doors at the ends of both of the paths will lead to Bowser's chamber, where the final fight takes place. The room that Bowser is fought in changes slightly depending on which path is taken; the path past the Thwomp leads to a version of the room with fewer bricks for Bowser to break through and fewer unbreakable blocks on each side, making the fight somewhat easier. | ||
Bowser attacks by breathing fire at different heights, and the player has to either [[jump]] or [[crouch]] to avoid them. After blowing two or three fire balls, Bowser will [[Bowser Bomb (move)|jump into the air and attempt to land on the player]]. If Bowser lands on the bricks below him, he will destroy them and create a gap. To defeat Bowser, the player has to lure him into landing on the same section three times. If Bowser breaks into the [[ | [[File:SMB3 Bowser Battle.png|thumb|The battle with Bowser in the NES version]] | ||
Bowser attacks by breathing fire at different heights, and the player has to either [[jump]] or [[crouch]] to avoid them. After blowing two or three fire balls, Bowser will [[Bowser Bomb (move)|jump into the air and attempt to land on the player]]. If Bowser lands on the bricks below him, he will destroy them and create a gap. To defeat Bowser, the player has to lure him into landing on the same section two or three times, depending on which version of the room the player lands in. If Bowser breaks into the [[pit]] below him, or is hit with 35 fireballs or at least three [[hammer]]s, he will be defeated and [[Princess Peach|Princess Toadstool]] will be rescued. Following this, the credits will roll and the curtains will close with a "The End" message. In the Japanese Famicom version, the screen will freeze on the image and the system will need to be turned off or reset. In all international NES versions, pressing {{button|NES|start}} will return to the title screen, and the player can start a new game with 28 [[P-Wing]]s. In the SNES and GBA versions, the game can return to the title screen by pressing {{button|SNES|start}}/{{button|GBA|start}} and will be given an option to save their progress. | |||
== Enemies == | ==Enemies== | ||
{|border=1 cellspacing=0 cellpadding=3 style="border-collapse:collapse"style="text-align: center" | |||
!Name | |||
!Count | |||
|- | |||
|[[File:SMB3 GrayBowserStatue.png]]<br>[[Bowser Statue]] | |||
|5 (laser) | |||
|- | |||
|[[File:SMB3 Hot Foot.gif]]<br>[[Hot Foot]] | |||
|1 | |||
|- | |||
|[[File:SMB3 Thwomp sprite.png]]<br>[[Thwomp]] | |||
|2 (horizontal) | |||
|- | |||
|[[File:Rotodisc.gif]]<br>[[Roto-Disc]] | |||
|6 | |||
|- | |||
|[[File:SMB3 Dry Bones Sprite.gif]]<br>[[Dry Bones]] | |||
|2 | |||
|- | |||
|[[File:SMB3 Lava Bubble.gif]]<br>[[Lava Bubble|Podoboo]] | |||
|7 | |||
|- | |||
|[[Fire Breath|Fireball]] | |||
|9 | |||
|- | |||
|align="center"style="background:#000000|[[File:BowserSMB3.png]]<br>[[Bowser]] | |||
|1 (boss) | |||
|} | |||
== Level statistics == | ==Level statistics== | ||
*[[List of power-ups|Power-ups]]: 2 ([[Super Mushroom]]s or [[Super Leaf|Super Leaves]]) | *[[List of power-ups|Power-ups]]: 2 ([[Super Mushroom]]s or [[Super Leaf|Super Leaves]]) | ||
*[[1-Up Mushroom]]s: 1 | *[[1-Up Mushroom]]s: 1 | ||
*Secret areas: 0 | *Secret areas: 0 | ||
{{SMB3 | ==Level map== | ||
[[Category:Bowser's | {{Wide image|SMB3 8-Bowser Castle Map.png|2000|Map of Bowser's Castle}} | ||
[[Category:Volcanic | |||
[[Category:Super Mario Bros. 3 | ==Gallery== | ||
<gallery> | |||
SMA4 World 8-BC Bowser Battle.png|The final battle in the GBA version | |||
</gallery> | |||
==Names in other languages== | |||
{{foreign names | |||
|Jap=ワールド8-城<ref>「スーパーマリオコレクション新装復刻版―任天堂公式ガイドブック」 (''Sūpā Mario Korekushon-Nintendo Kōshiki Guidebook''), page 278.</ref> | |||
|JapR=Wārudo 8-Shiro | |||
|JapM=World 8-Castle | |||
|Ger= | |||
|GerM= | |||
}} | |||
==References== | |||
<references/> | |||
{{SMB3 levels}} | |||
[[Category:Bowser's castles]] | |||
[[Category:Volcanic areas]] | |||
[[Category:Super Mario Bros. 3 levels]] | |||
[[Category:Amiibo tap: Nintendo's Greatest Bits]] | [[Category:Amiibo tap: Nintendo's Greatest Bits]] | ||
Latest revision as of 13:26, May 10, 2024
| Level | |
|---|---|
| World 8- | |

| |
| Level code | World 8-Bowser's Castle |
| World | Dark Land |
| Game | Super Mario Bros. 3 |
| Time limit | 400 seconds |
| Boss | Bowser |
| << Directory of levels >> | |
World 8-![]() Bowser's Castle is the eleventh and final level of Dark Land in Super Mario Bros. 3, and is the final level in the game. It becomes accessible after the player clears World 8-
Bowser's Castle is the eleventh and final level of Dark Land in Super Mario Bros. 3, and is the final level in the game. It becomes accessible after the player clears World 8-![]() Tank.
Tank.
Layout[edit]

The player starts next to a trio of Bowser Statues, which will fire lasers when the player approaches. At the top of a set of stairs is an invisible lift that will start rising when the player steps onto it; if the player misses the lift, they can enter the nearby door and then move left, avoiding Dry Bones, to another door to be brought back to the beginning of the castle to try again. Once the lift reaches its peak, the player will find a Donut Lift to the right and must ride it down, jumping off to the right when able before the block falls into the abyss. After passing a Hot Foot, the player will have to jump up stairs lined with three Roto-Discs, then fall down the next set of stairs avoiding the same Roto-Discs. A 1-Up Mushroom can also be collected at the top of the stairs, next to the wall on the right. Next, the player has to jump across several Donut Lift platforms while avoiding Podoboos and falling in the lava below. At the end of this area, the path splits in four ways, with the second from the top path having a power-up and the bottom-most path leading back to the start of the castle. The other two paths lead to Bowser.
If the player takes the top path, they will have to jump over four Bowser Statues. Afterward, they must jump across Donut Lift platforms while avoiding Bowser's Fire Breath, along with avoiding one more Bowser Statue above. If the player takes the path second from the bottom, they will first have to avoid a sliding Thwomp and ride a Donut Lift downward to other platforms they have to jump across, while avoiding a Roto-Disc. Then the player has to navigate Bowser Statues set up on sets of stairs, and a power-up is placed in the center of this room. After the Bowser Statues are platforms over lava the player has to jump across while avoiding Bowser's Fire Breath and one more Bowser Statue above. The doors at the ends of both of the paths will lead to Bowser's chamber, where the final fight takes place. The room that Bowser is fought in changes slightly depending on which path is taken; the path past the Thwomp leads to a version of the room with fewer bricks for Bowser to break through and fewer unbreakable blocks on each side, making the fight somewhat easier.

Bowser attacks by breathing fire at different heights, and the player has to either jump or crouch to avoid them. After blowing two or three fire balls, Bowser will jump into the air and attempt to land on the player. If Bowser lands on the bricks below him, he will destroy them and create a gap. To defeat Bowser, the player has to lure him into landing on the same section two or three times, depending on which version of the room the player lands in. If Bowser breaks into the pit below him, or is hit with 35 fireballs or at least three hammers, he will be defeated and Princess Toadstool will be rescued. Following this, the credits will roll and the curtains will close with a "The End" message. In the Japanese Famicom version, the screen will freeze on the image and the system will need to be turned off or reset. In all international NES versions, pressing ![]() will return to the title screen, and the player can start a new game with 28 P-Wings. In the SNES and GBA versions, the game can return to the title screen by pressing
will return to the title screen, and the player can start a new game with 28 P-Wings. In the SNES and GBA versions, the game can return to the title screen by pressing ![]() /
/![]() and will be given an option to save their progress.
and will be given an option to save their progress.
Enemies[edit]
| Name | Count |
|---|---|
Bowser Statue |
5 (laser) |
Hot Foot |
1 |
Thwomp |
2 (horizontal) |
 Roto-Disc |
6 |
Dry Bones |
2 |
Podoboo |
7 |
| Fireball | 9 |
Bowser |
1 (boss) |
Level statistics[edit]
- Power-ups: 2 (Super Mushrooms or Super Leaves)
- 1-Up Mushrooms: 1
- Secret areas: 0
Level map[edit]

Gallery[edit]
The final battle in the GBA version

Names in other languages[edit]
| Language | Name | Meaning |
|---|---|---|
| Japanese | ワールド8-城[1] Wārudo 8-Shiro |
World 8-Castle |
References[edit]
- ^ 「スーパーマリオコレクション新装復刻版―任天堂公式ガイドブック」 (Sūpā Mario Korekushon-Nintendo Kōshiki Guidebook), page 278.